AWS IoT Core×Unityでオフィストイレのデジタルツインを構築してみた
こんにちは。
私たちは、CoE(Center of Excellence)活動として、新技術の探索・検証や先行事例の調査を行っています。
昨今、現実空間のオブジェクトを仮想空間上のモデルで表現するデジタルツイン技術が注目されています。
デジタルツインを活用することで、現実空間のリアルタイムモニタリングや、現実空間では実現できない
仮想空間上のモデルを使ったシミュレーションなどが可能となります。
今回は身近な例として、AWS IoT CoreとUnityを組み合わせて、オフィストイレのデジタルツインを構築してみました。AWS IoT
TwinMakerの利用も検討しましたが、本ブログ執筆時点で3Dモデルを自由に動かすことは不可だったため、Unityを採用しています。
コロナ感染状況が落ち着いてきて混雑し始めているオフィストイレの個室利用状況を、トイレに足を運ばずとも自席から確認できるようになるのが嬉しいポイントです。
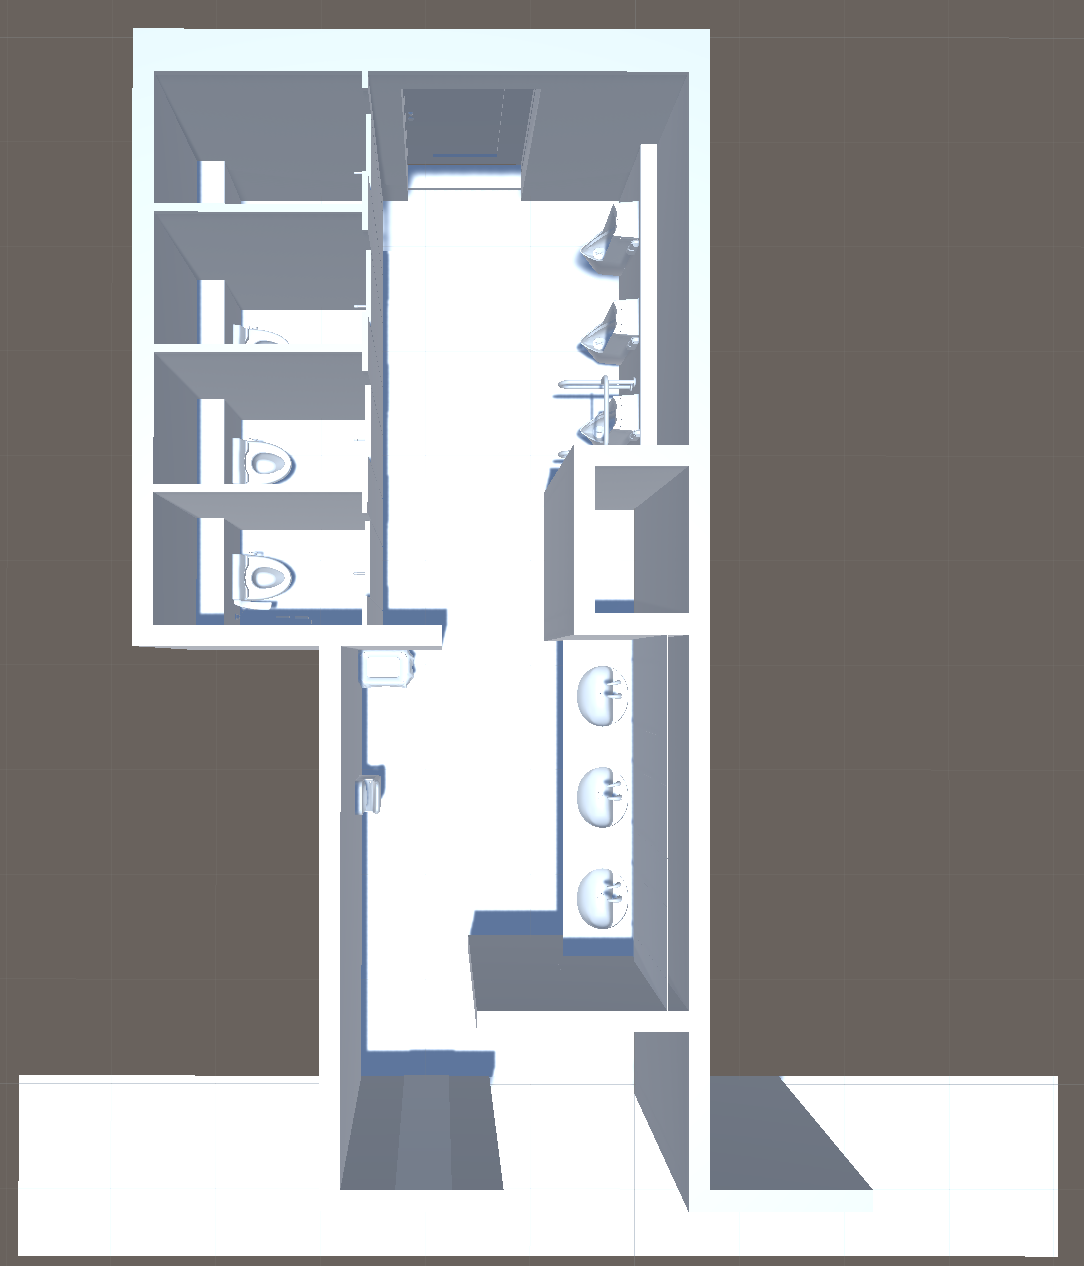
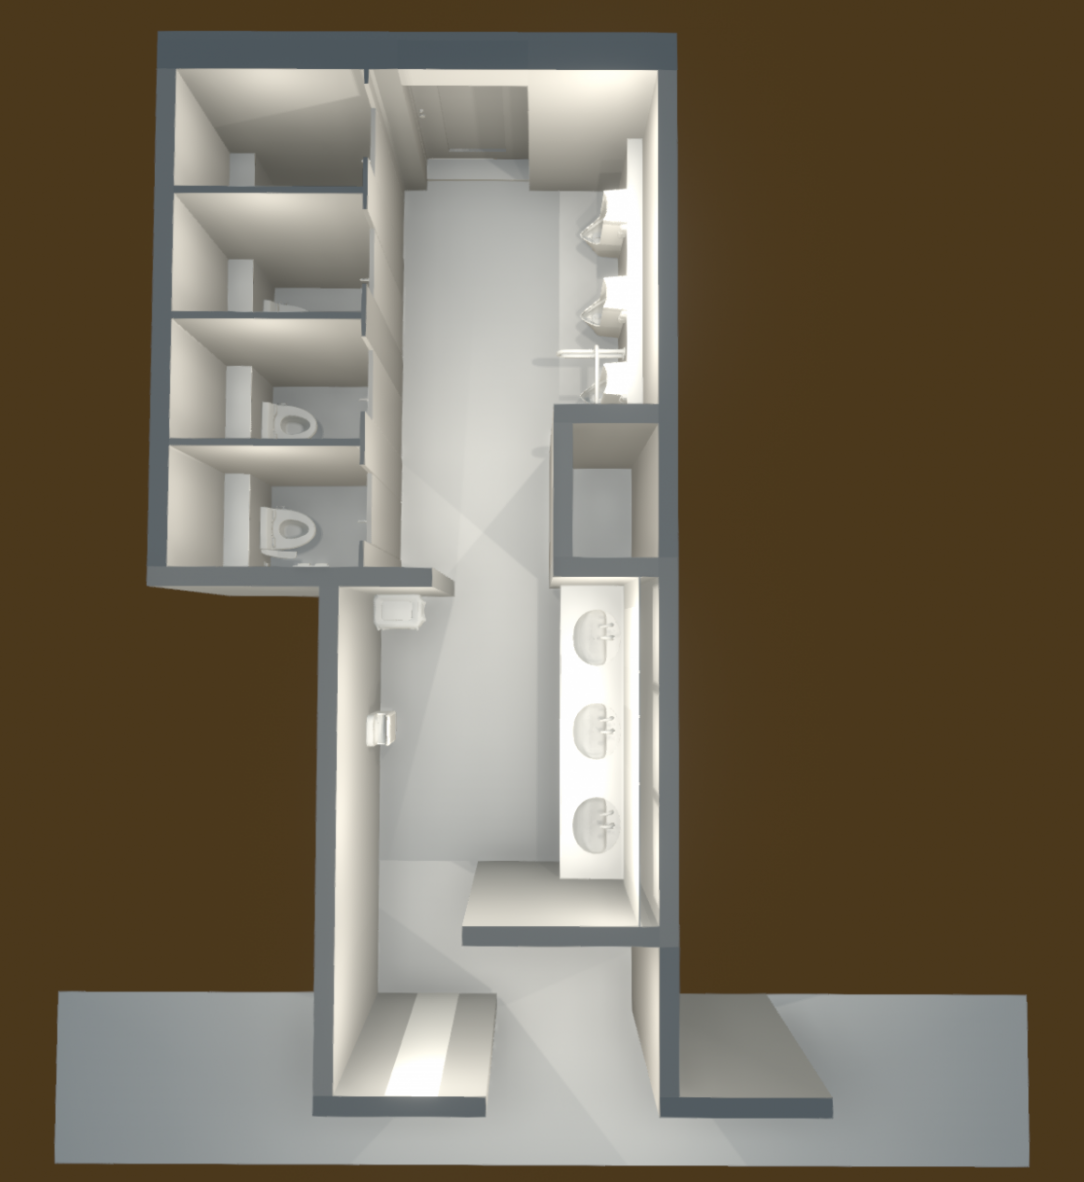
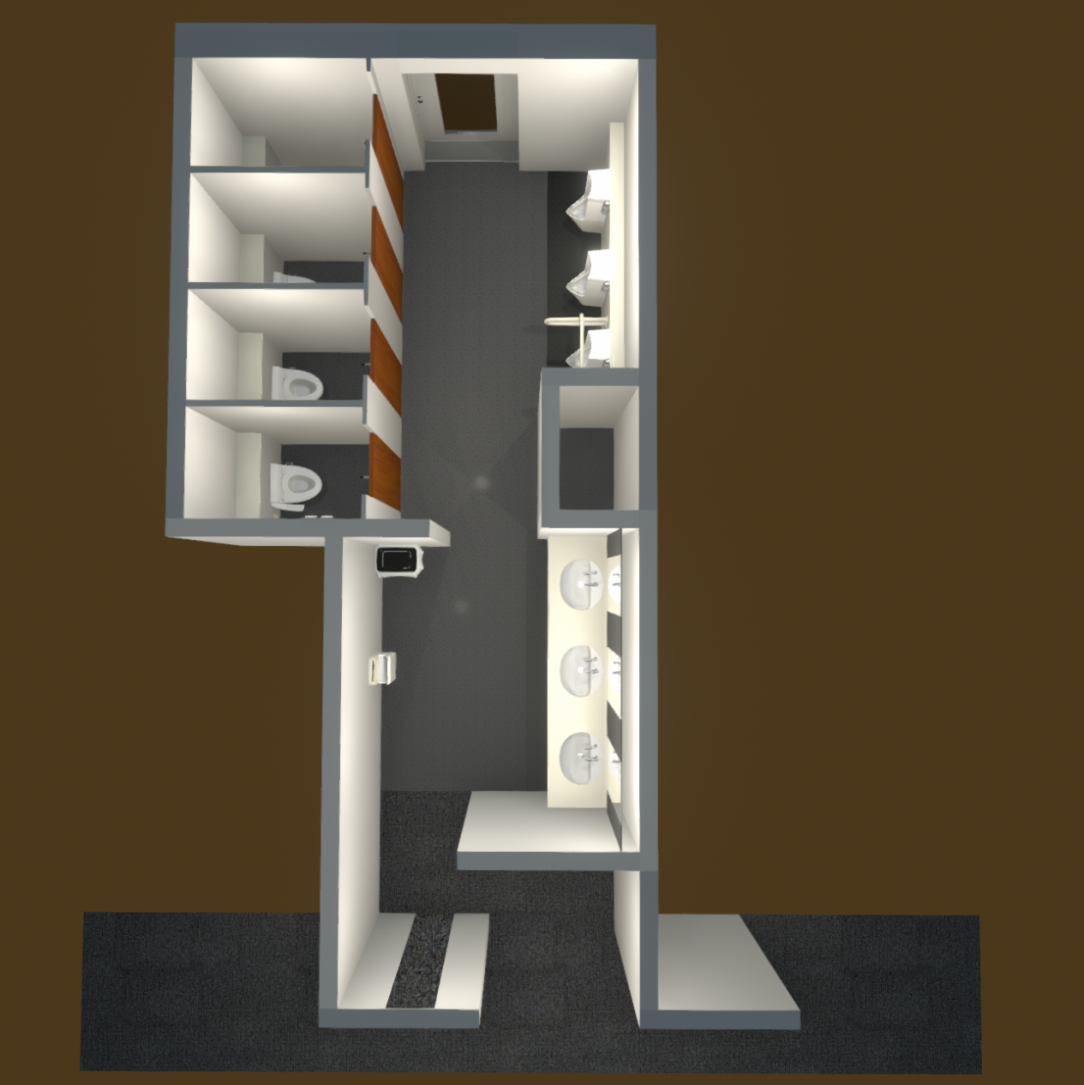
構築したデジタルツイン
まず初めに、構築したデジタルツインを紹介します。
現実空間のトイレドアの開閉に連動して、仮想空間上の3Dモデルのドアを開閉させています。加えて、ドアが閉じている時間も表示させています。
ドア開閉のラグは1秒程度であり、それなりに短いなという印象でした。
※撮影の関係上、トイレドアではなくオフィスドアを使っています
全体構成図
全体構成図は下記の通りです。
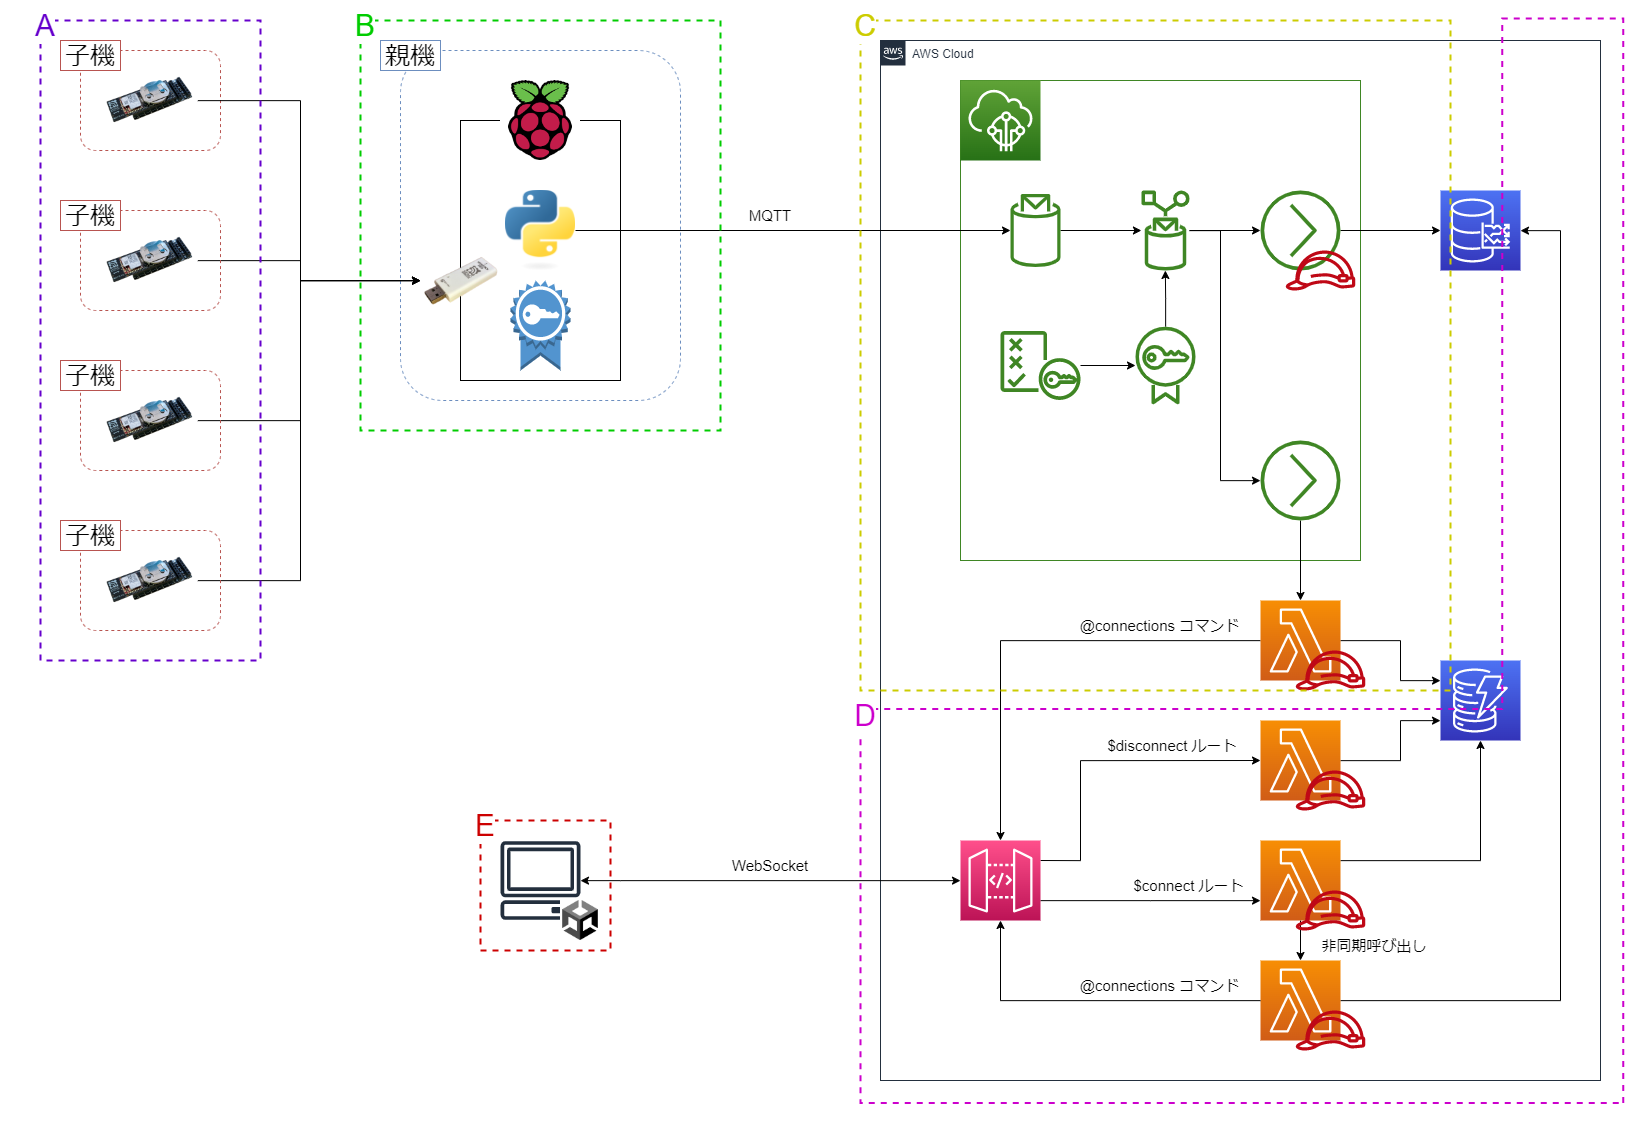
A. IoT(子機)
ドア開閉の検知には開閉センサーである
OPEN-CLOSE SENSE PAL
を使い、これに無線モジュールであるRED PAL
を接続し子機としました。
子機は各個室のドアに取り付け、ドアの開閉情報を親機に送信します。
B. IoT(親機)
ドアの開閉情報の受信にはMONOSTICK RED
を使い、
これをRaspberry Piに接続し親機としました。
Raspberry Piには、受信したドアの開閉情報を
IoT Coreにpublishするための証明書と鍵を配置の上、
Pythonスクリプトを稼働させています。
C.IoT用サーバ
IoT Coreは開閉情報を受信すると、その情報をTimestreamに格納します。
同時に
Lambdaを呼び出し、API Gatewayの@connectionsコマンドを使ってクライアントアプリに対するリアルタイムな開閉情報の送信を実現しています。
D.クライアントアプリ用サーバ
クライアントアプリとサーバ間の開閉情報のやりとりには、サーバからリアルタイムに開閉情報を送信するため、WebSocket APIを使いました。
WebSocket APIのコネクションIDは
DynamoDBで管理しています。
コネクション新規作成時には、Timestream
から取得した各ドアの最新の開閉状態をクライアントアプリに返却しています。
E. クライアントアプリ
ドアをリアルタイムに連動できるUnityを使って3Dモデルを動かしました。
構築の流れ
①開閉情報の開閉センサーからTimestreamへの格納、②開閉情報のクライアントアプリへの送信、③3Dモデル作成の3つに分けて、構築の流れを説明します。
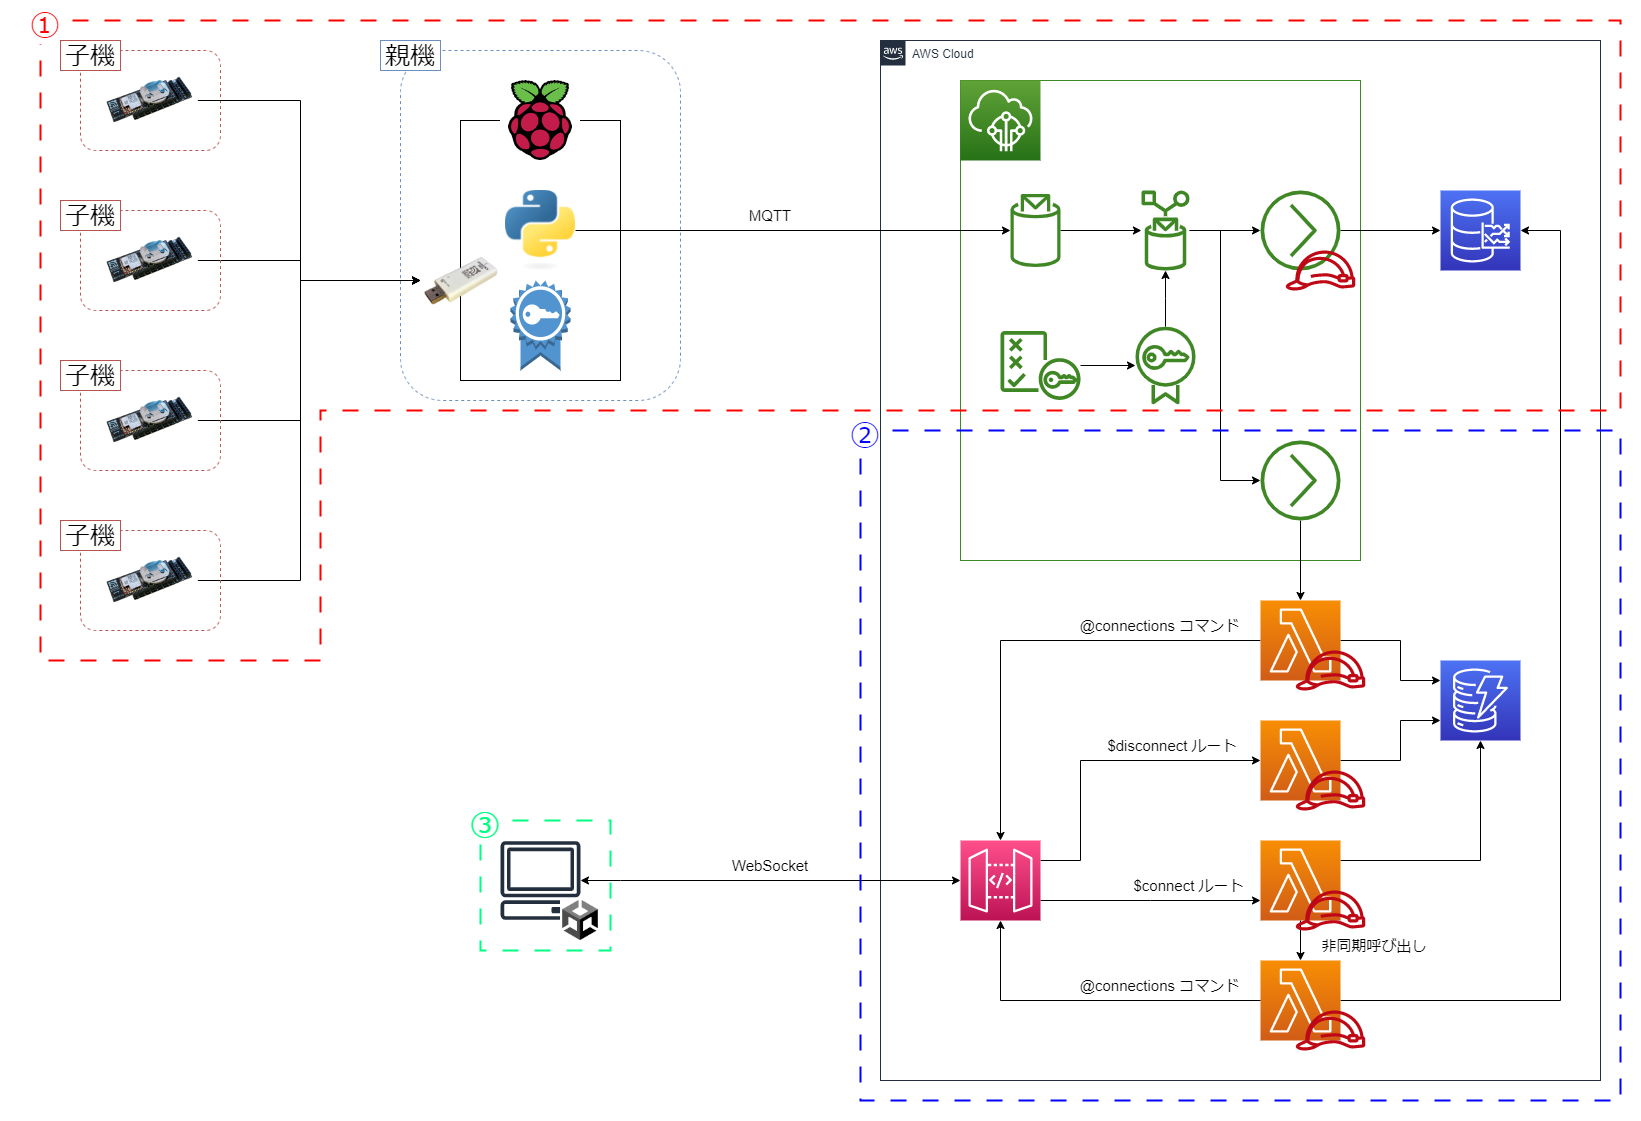
①開閉情報の開閉センサーからTimestreamへの格納
Timestream設定
データベースを作成します。
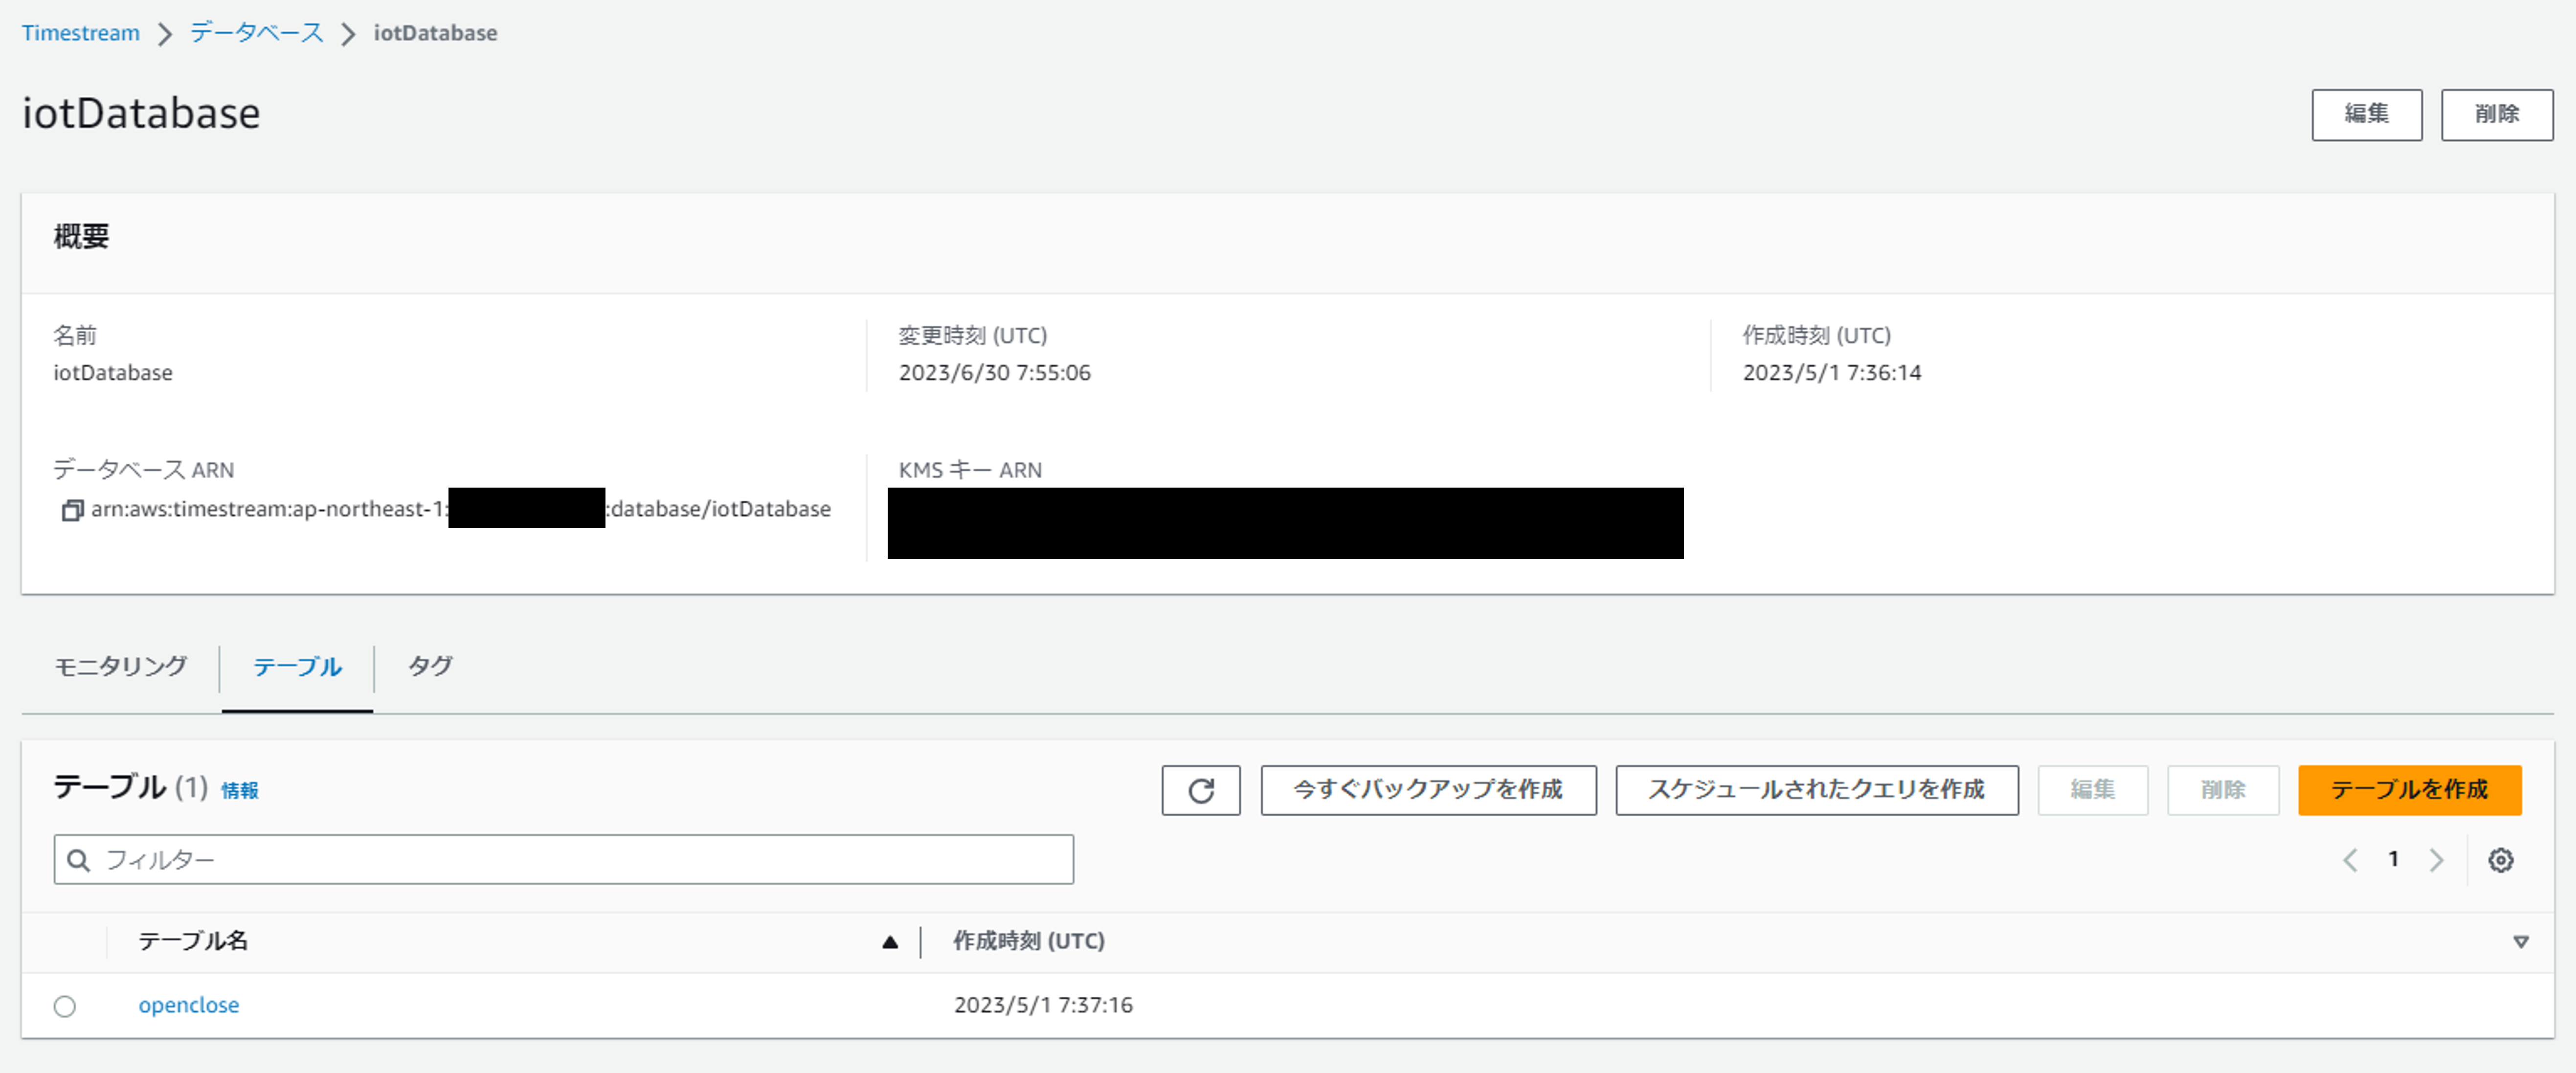
続いてテーブルを作成します。
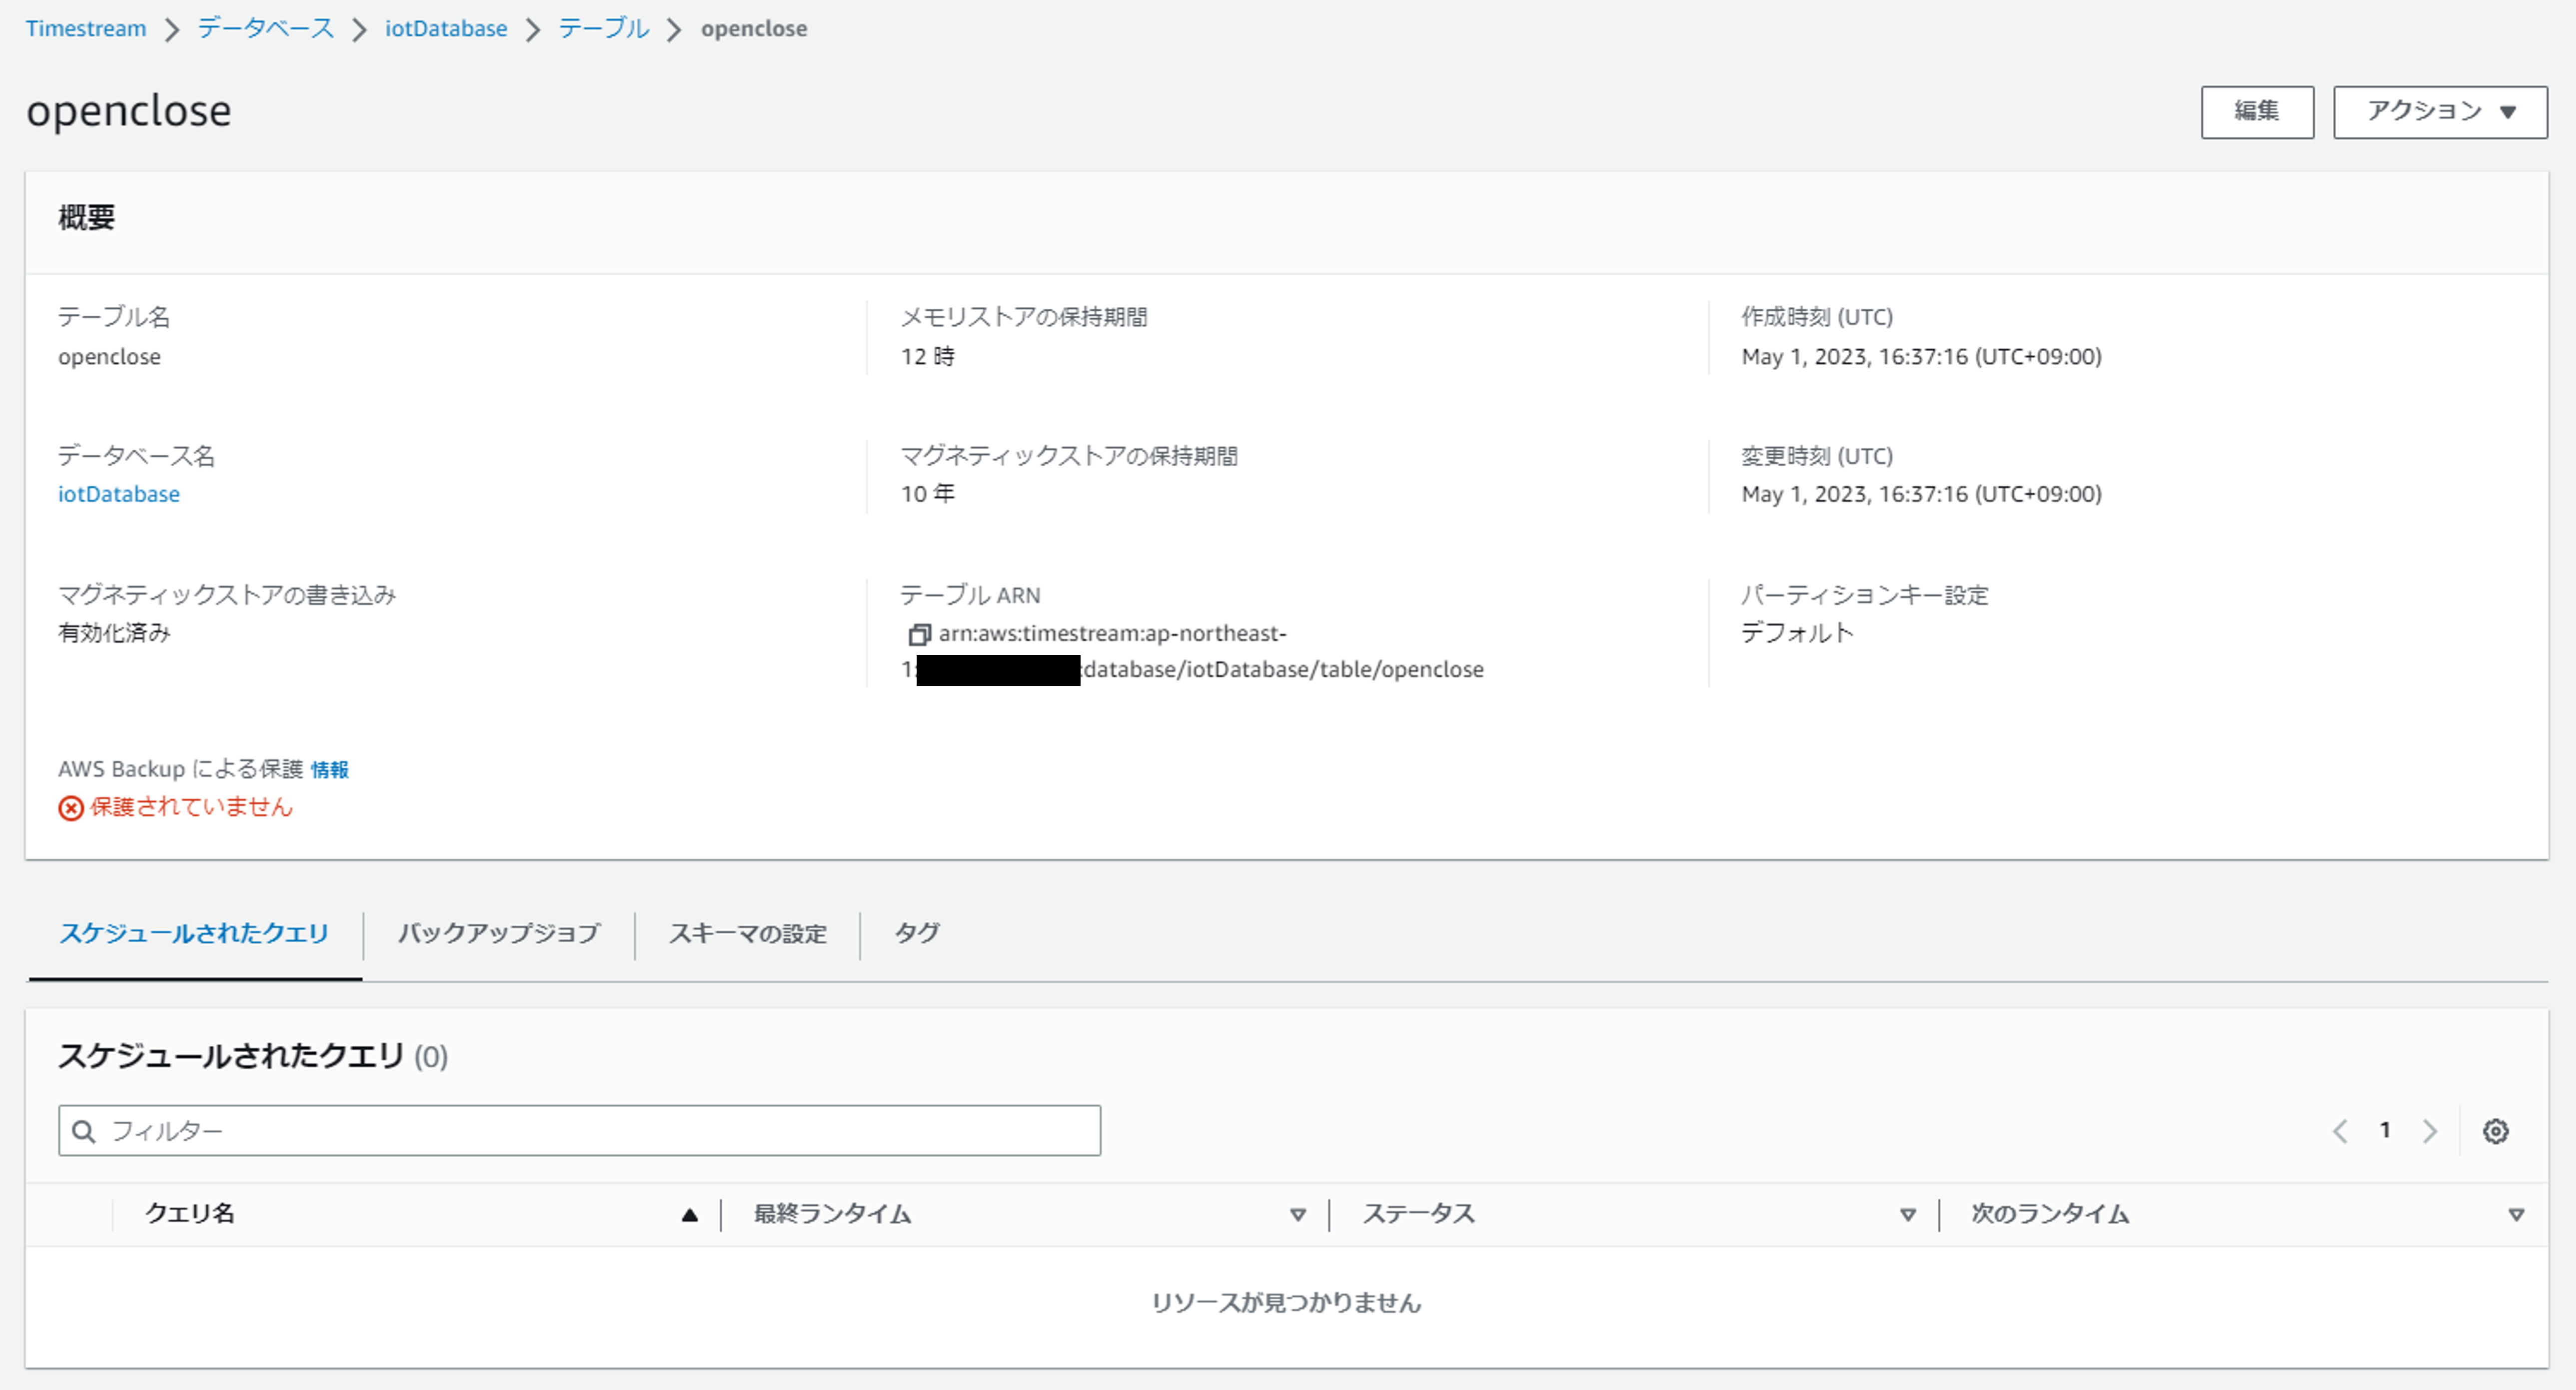
以上でTimestreamの設定は完了です。
IoT Core設定
親機に対応するモノを作成します。
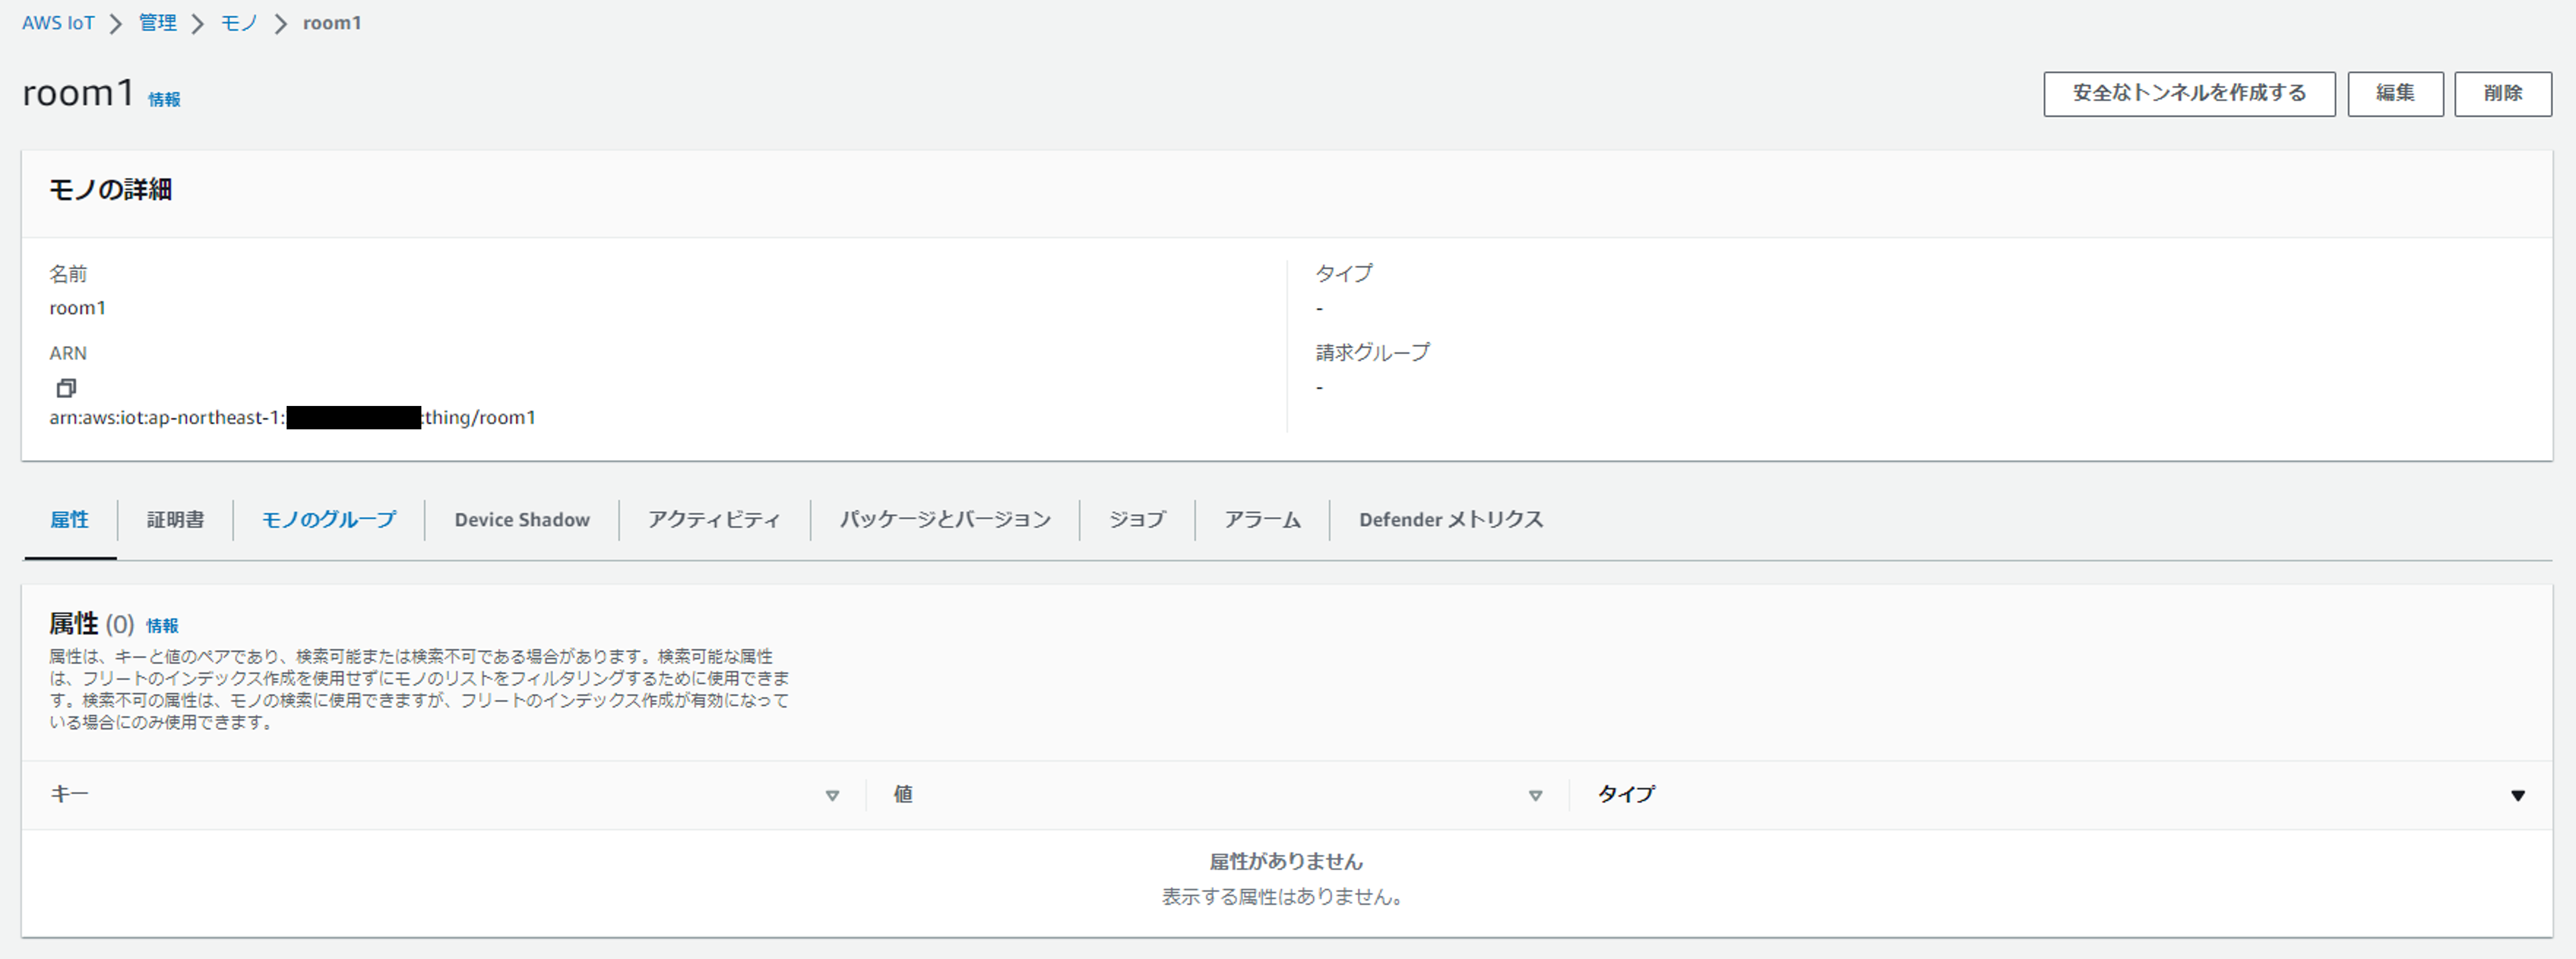
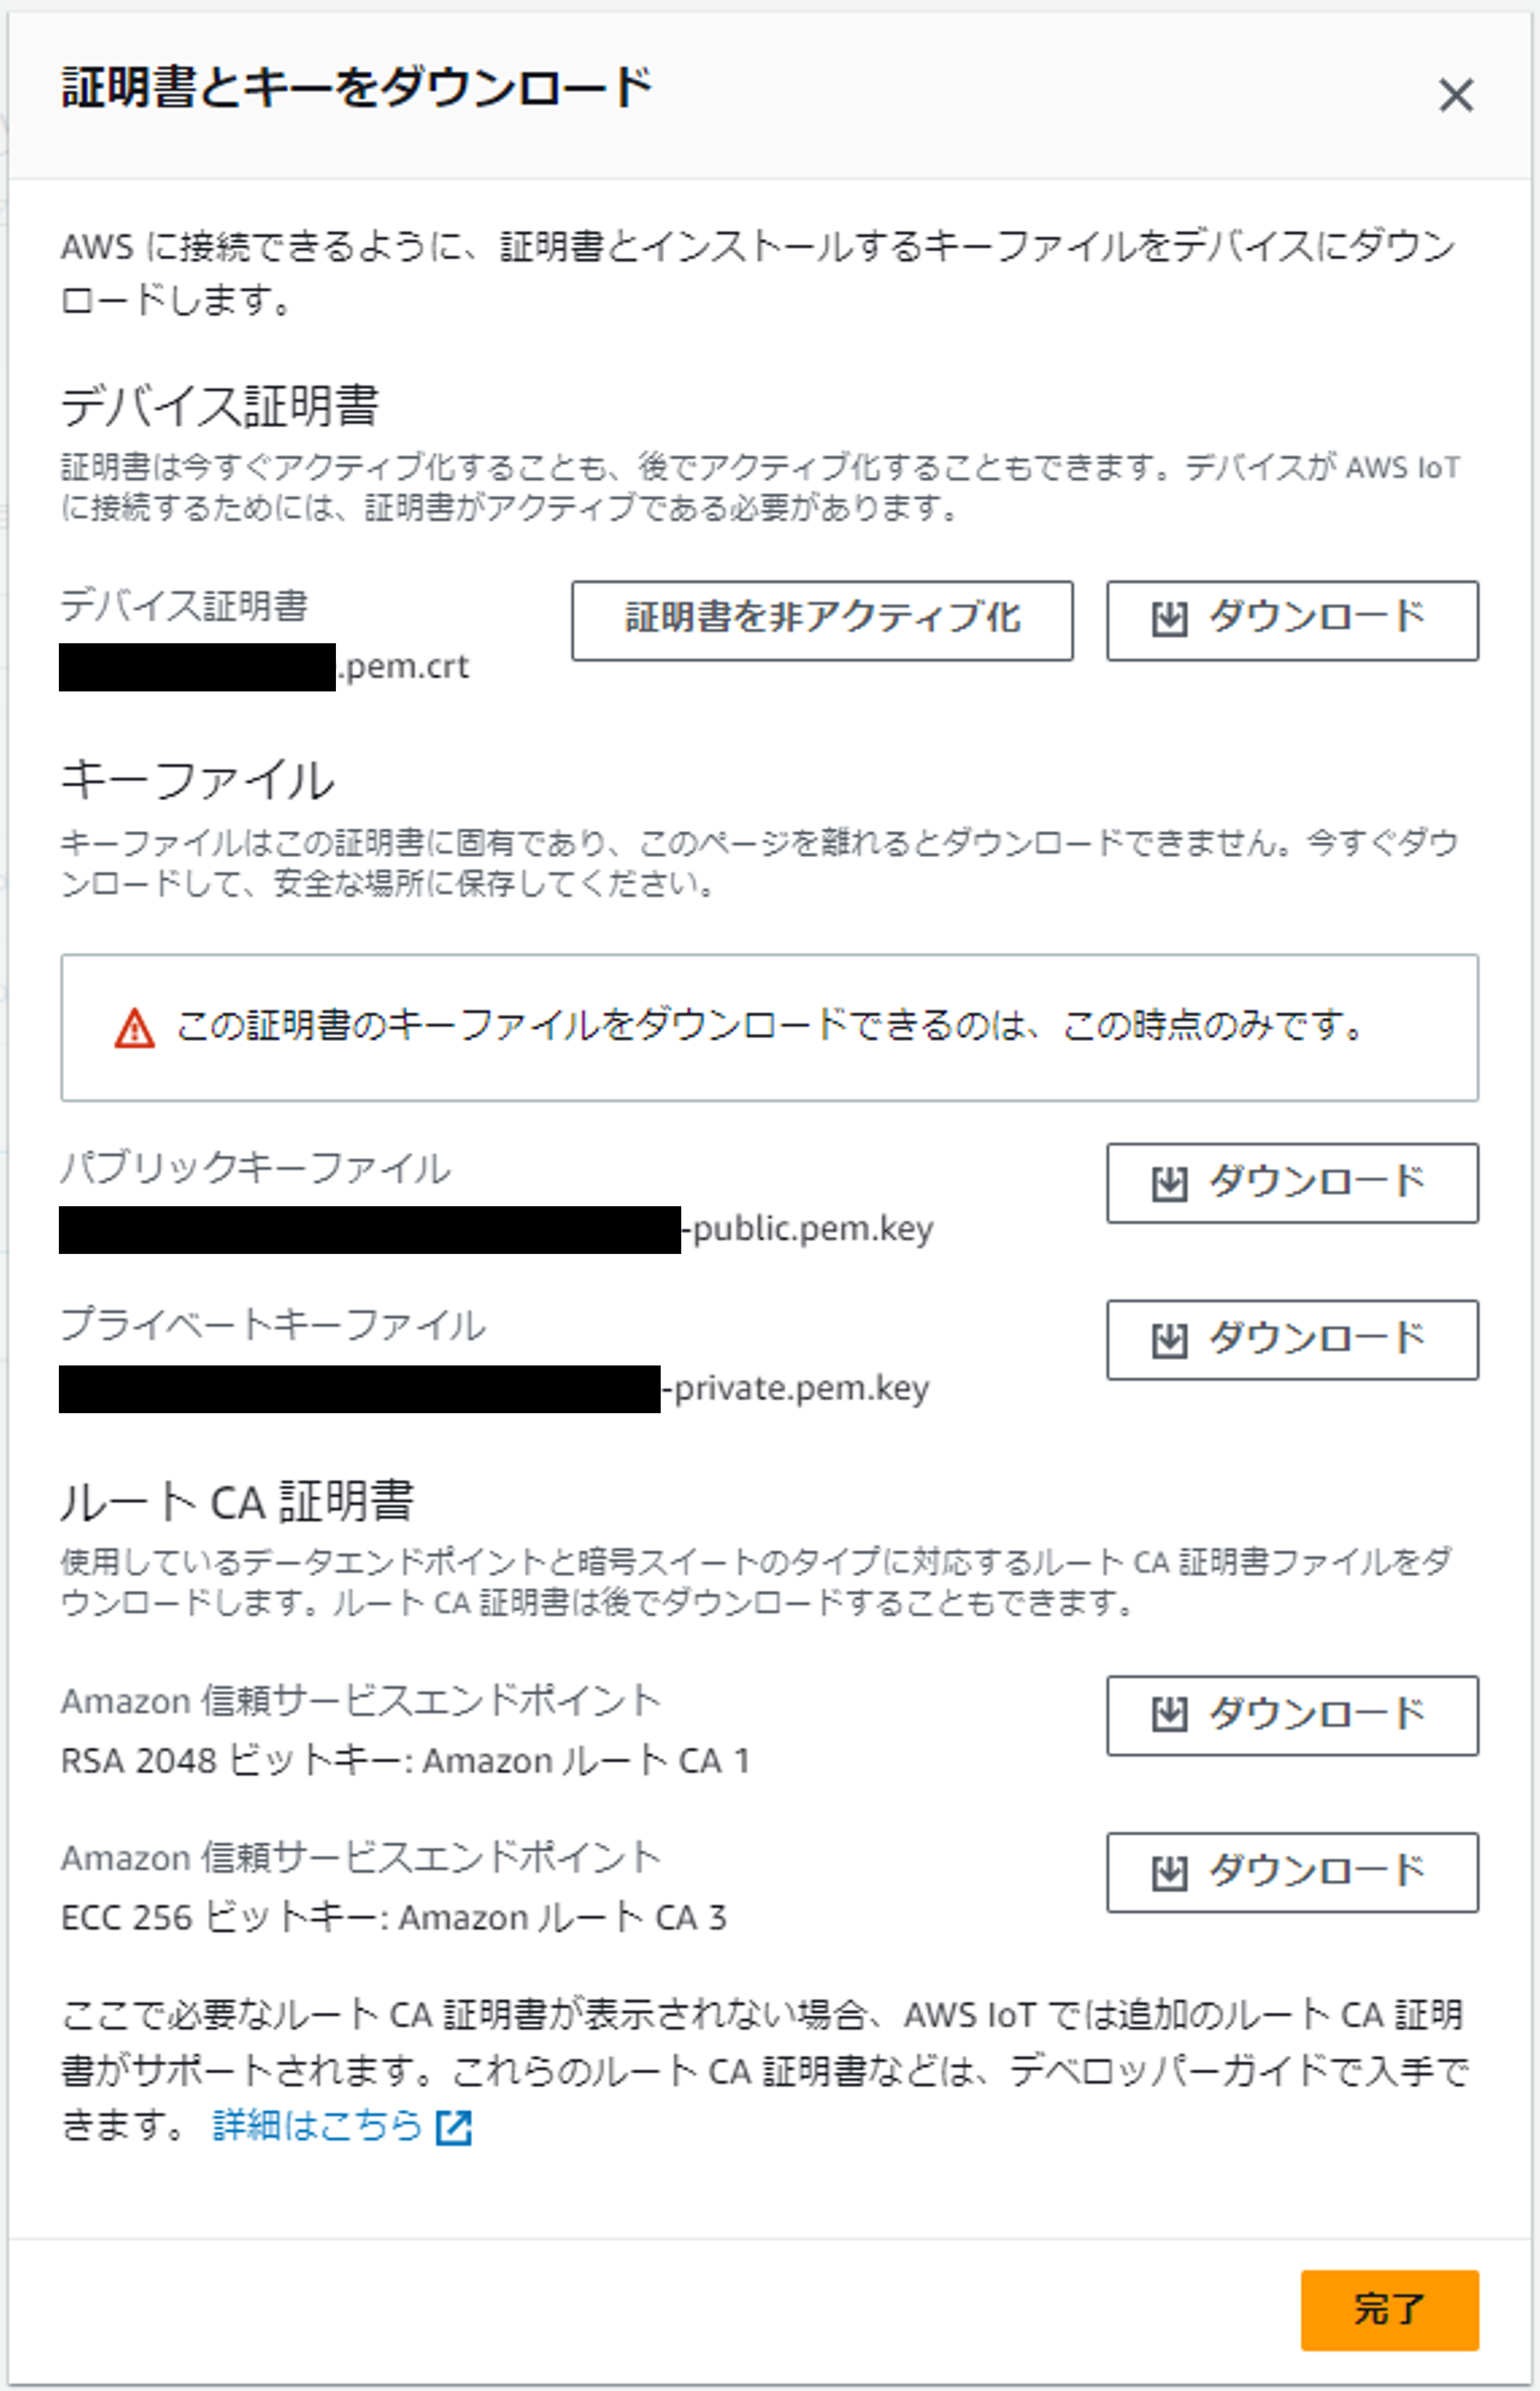
モノ作成時に、デバイス証明書・キーファイル・ルート CA 証明書をダウンロードしておきます
。
これらは後で親機内に配置することとなります。
紐付ける証明書のポリシーには、この後作成するIoTルールのトピックへのPublish権限と、クライアントIDへのConnect権限をつけておきます。
ソースを展開
{
  "Version": "2012-10-17",
  "Statement": [
    {
      "Effect": "Allow",
      "Action": "iot:Publish",
      "Resource": "arn:aws:iot:ap-northeast-1:XXXXXXXXXXXX:topic/$aws/rules/openclose_timestream/*"
    },
    {
      "Effect": "Allow",
      "Action": "iot:Connect",
      "Resource": "arn:aws:iot:ap-northeast-1:XXXXXXXXXXXX:client/Room1"
    }
  ]
}
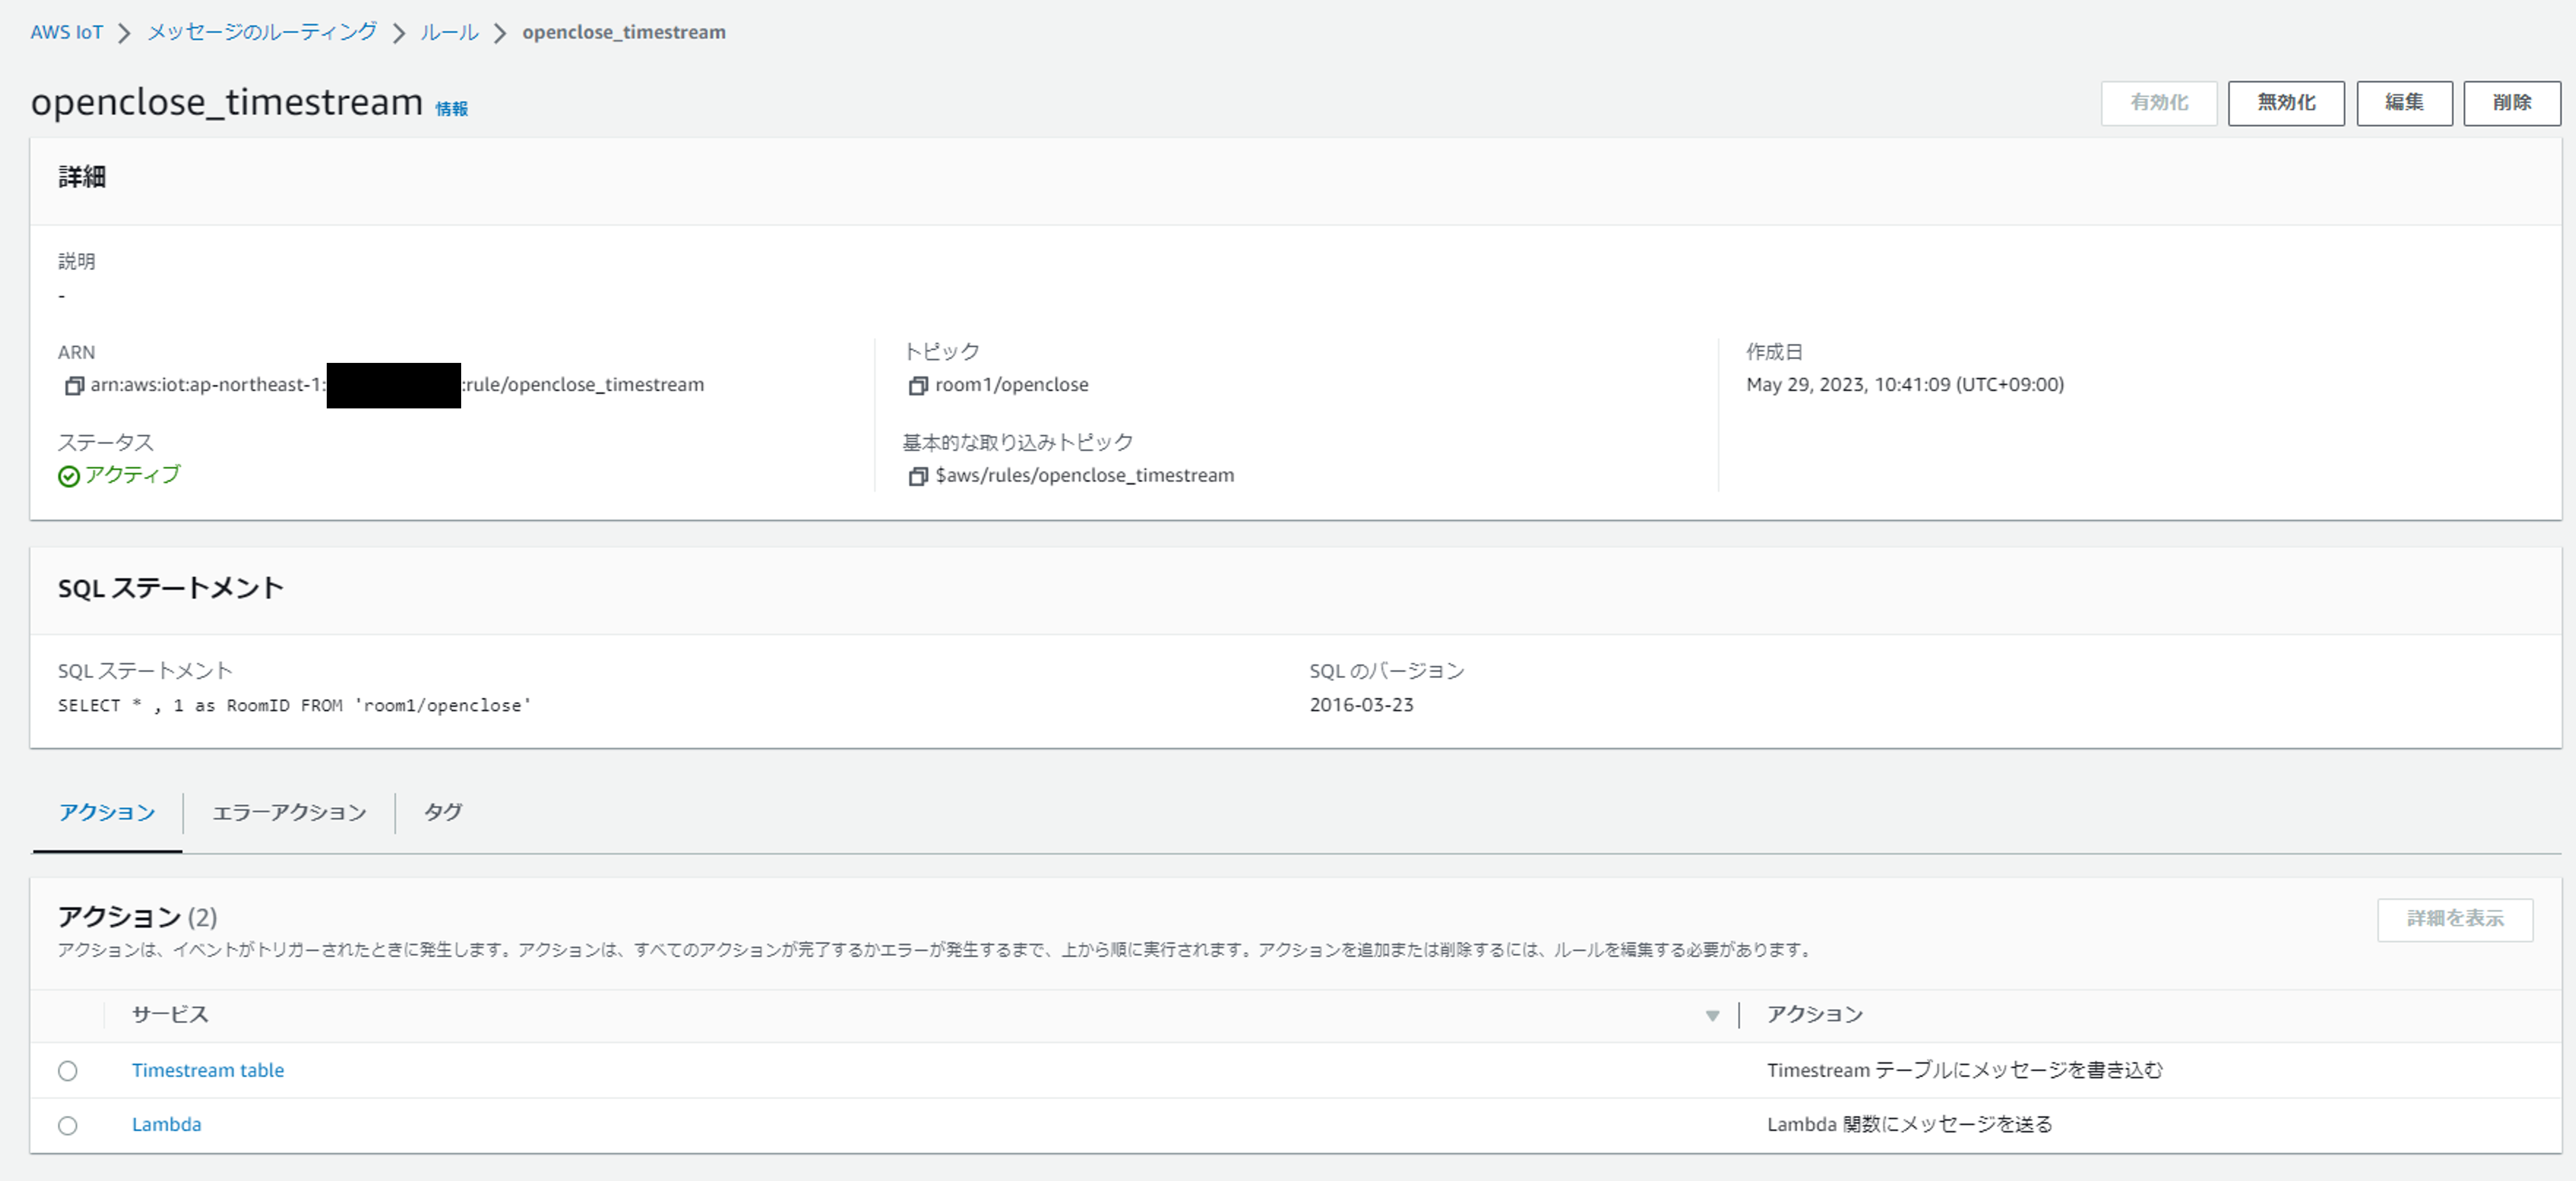
続いてルールを作成します。
SELECT句では、「*」で親機から
受信したメッセージ全体を取得するとともに、「1 as RoomID」で受信したメッセージがどのトイレに設定された親機からかの情報を追加しています。今回は親機は1つしかないため、親機のIDを表すRoomIDは1としています。
FROM句では、どのトピックにメッセージがPublishされたらこのルールをトリガするかを指定しています。トイレ1の各ドアの開閉情報のPublish先トピックとして「room1/openclose」としています。
「基本的な取り込みトピック」に表示されているトピックが、上で作成したポリシー内でPublish先として設定したものと同じとなっていることに注意してください。
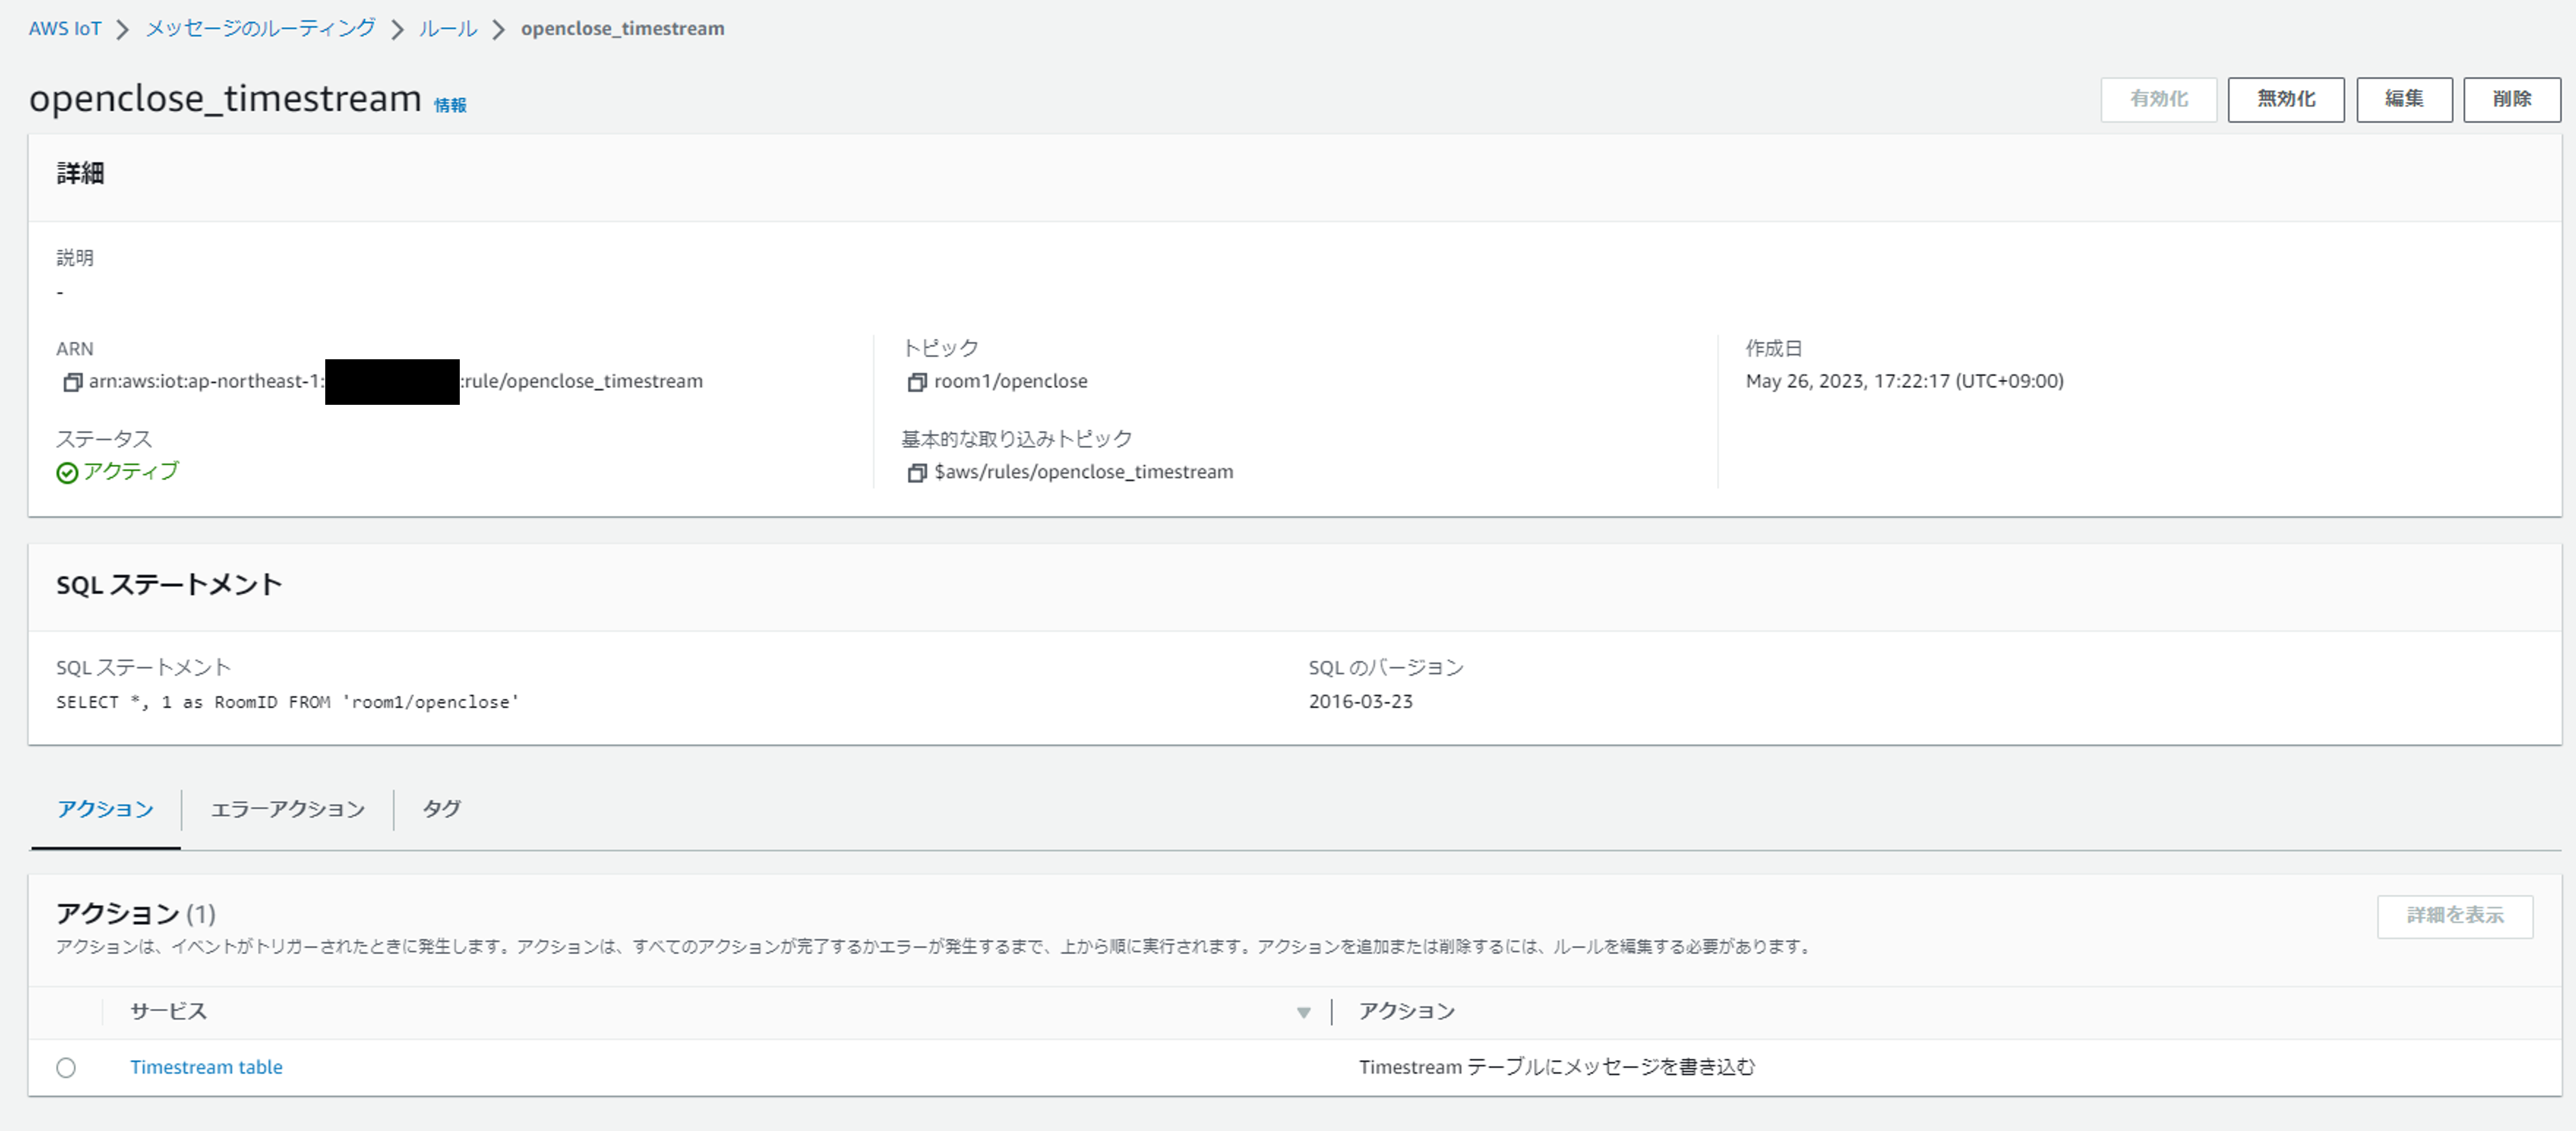
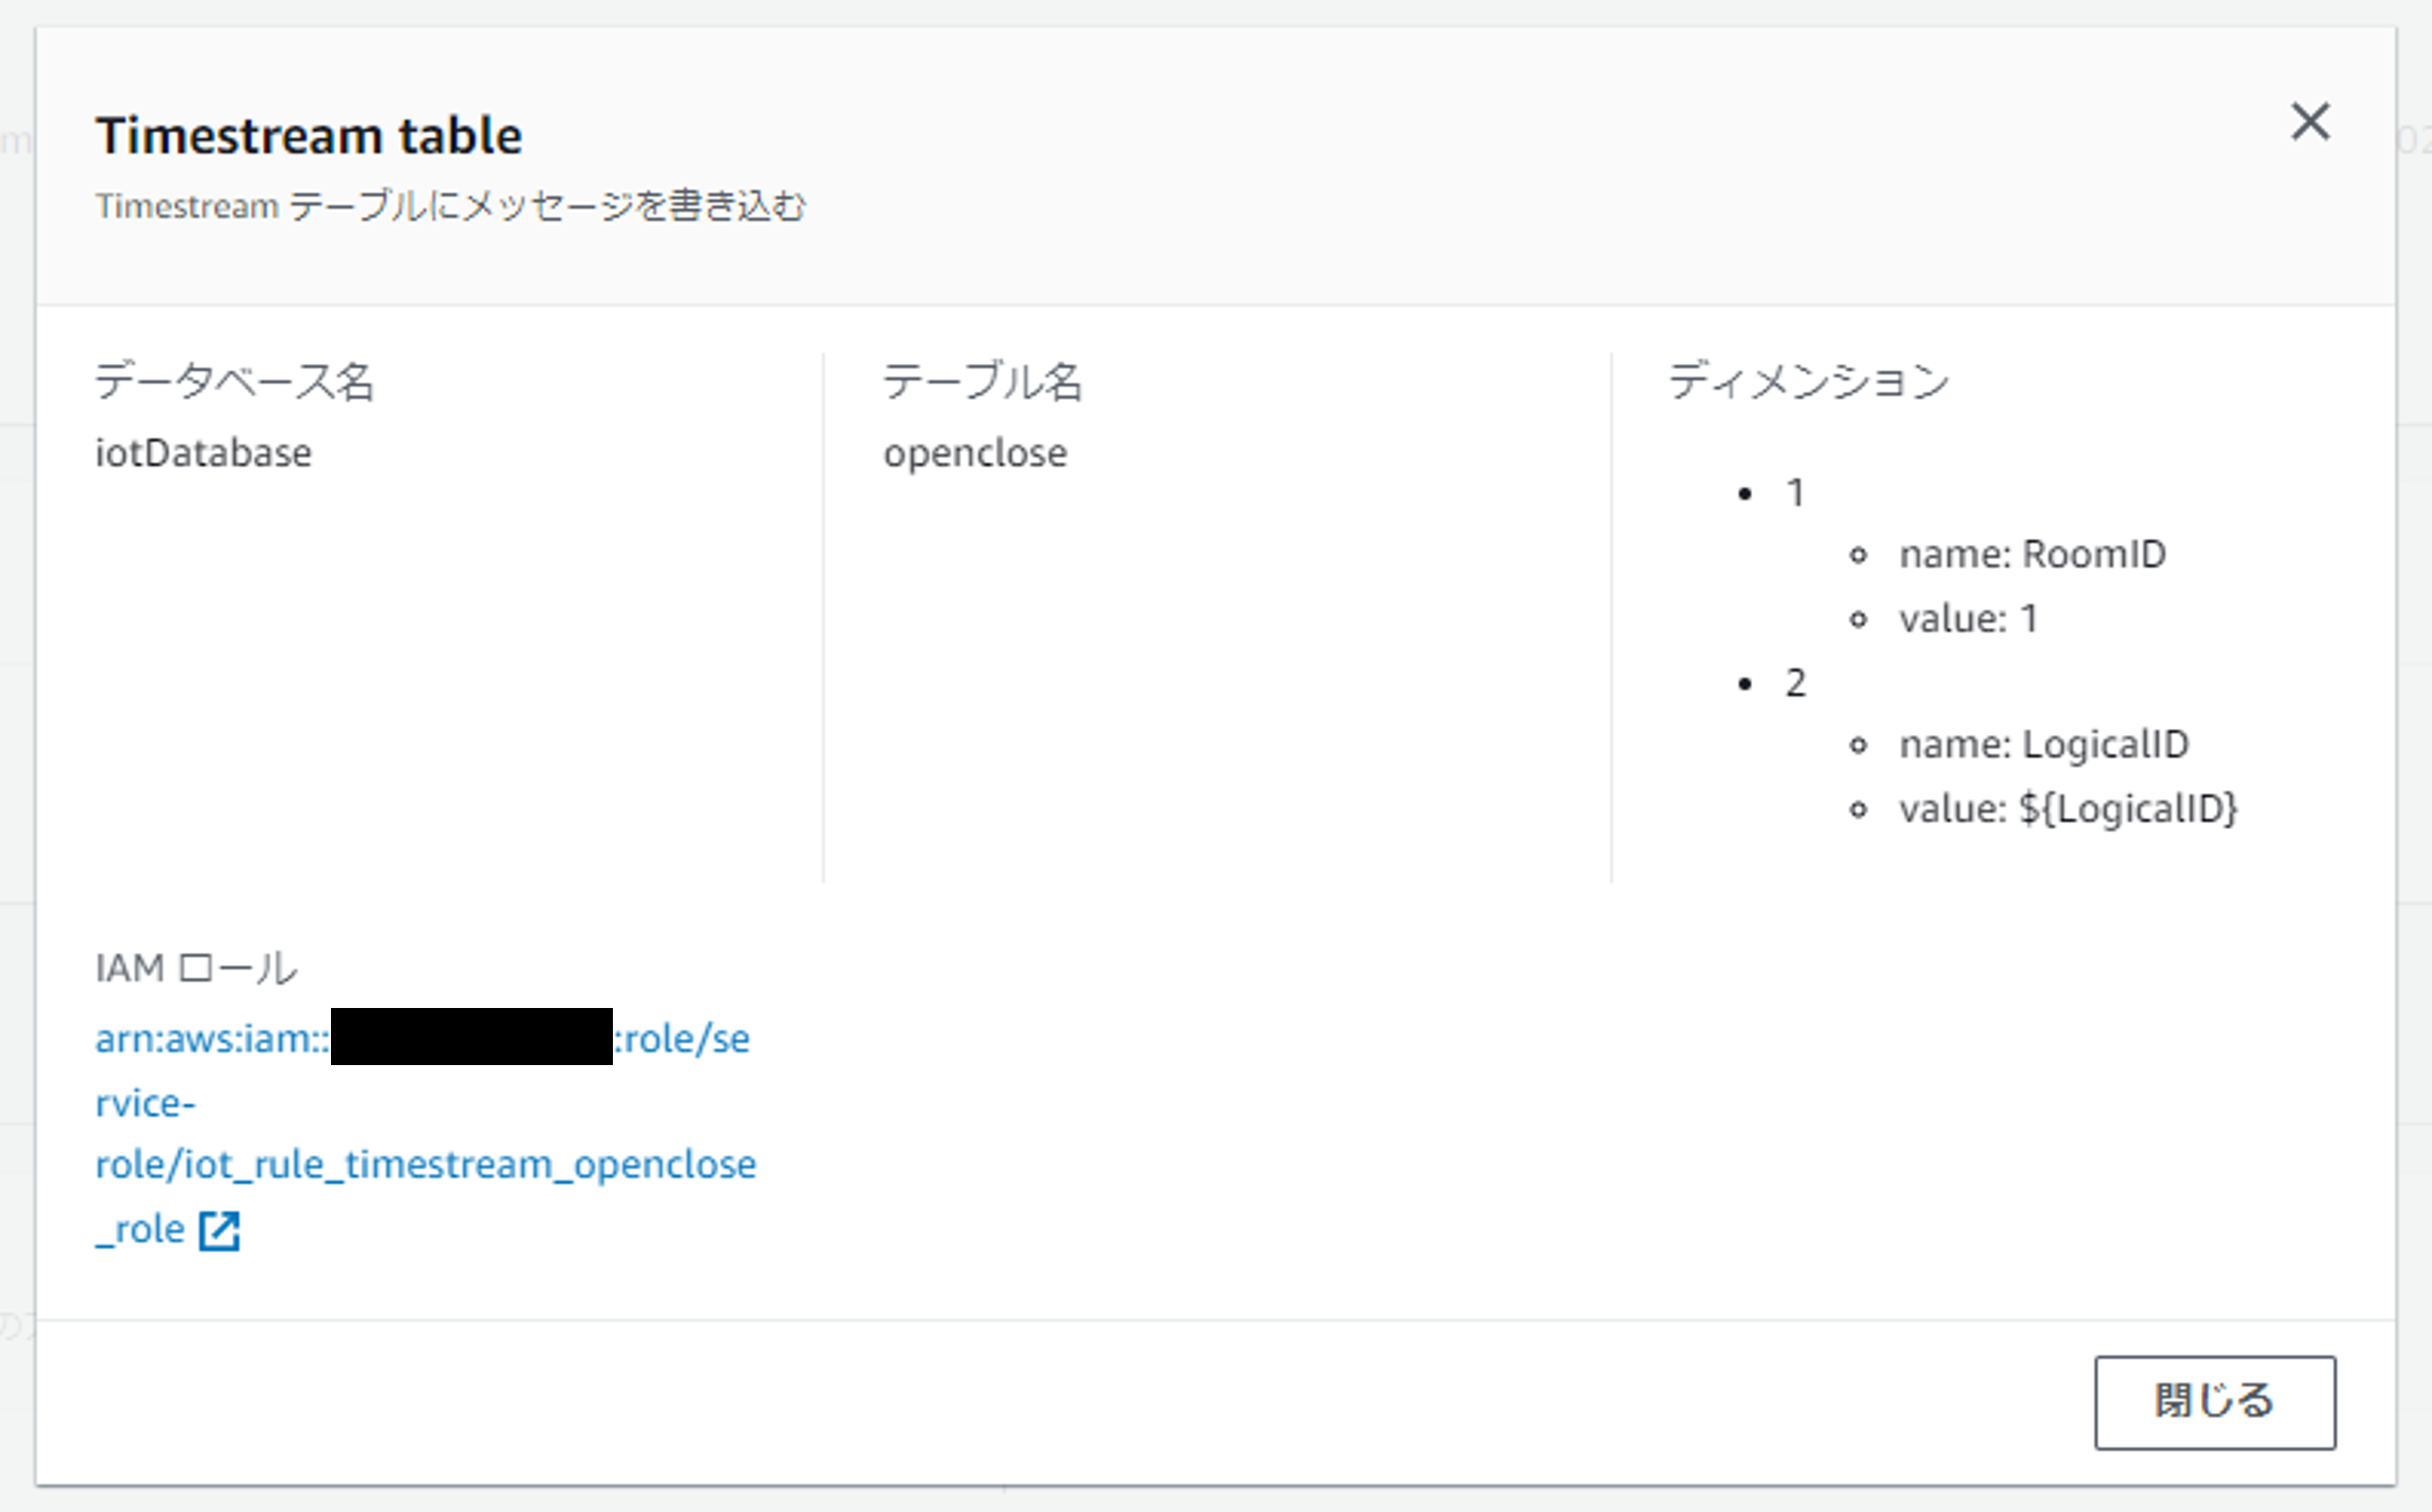
ルールアクションには、Timestreamにメッセージを書き込む設定を追加します。
ディメンション名には、
親機のIDを表す「RoomID」と子機のIDを表す「LogicalID」を指定しています。ディメンション値は、RoomIDは1とし、LogicalIDはメッセージから取得するようにしています。
Timestreamテーブルへの書き込みを行うためにIAMロールもつけておきます。今回IAMロールはルール作成時に自動作成しました。
以上でIoT Coreの設定は完了です。
親機設定
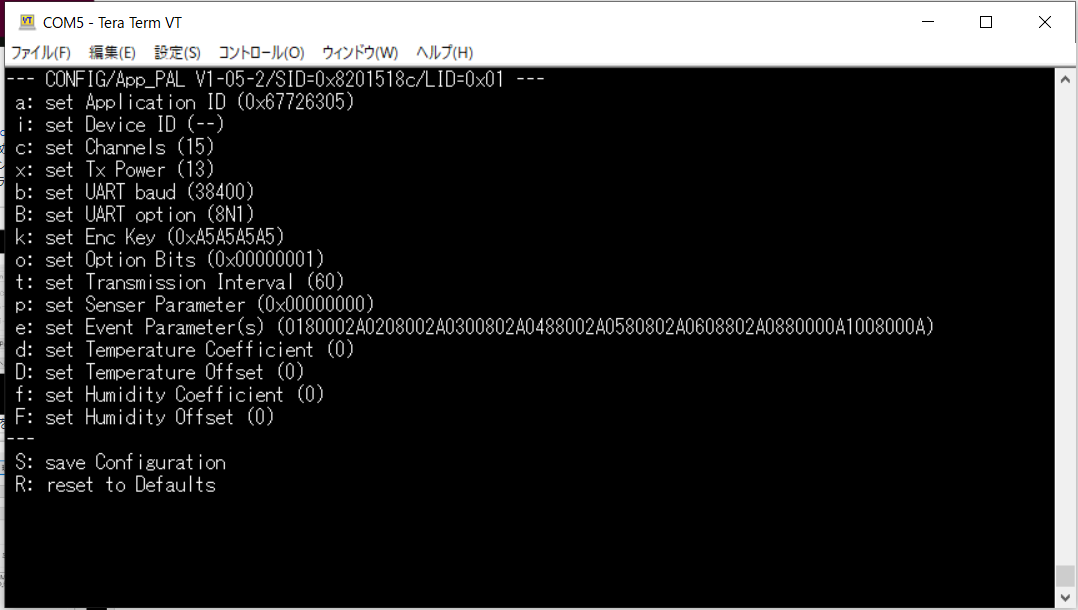
MONOSTICK REDの設定を行います。
MONOSTICK REDを設定用PCにUSB接続し
、TWELITE STAGE
を使って
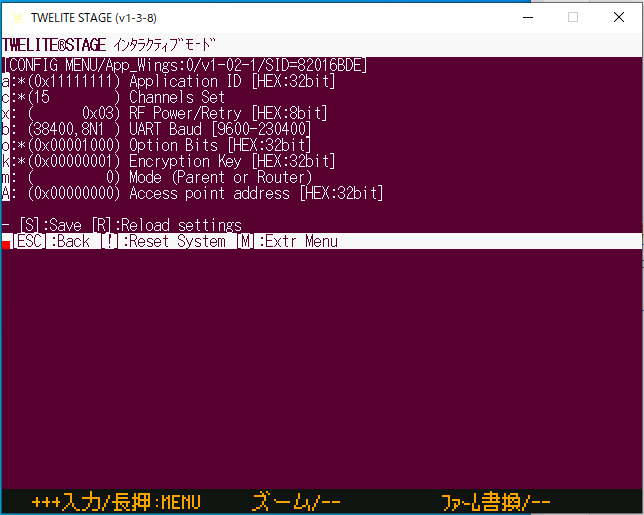
インタラクティブモードに入り、Application ID・Channels Set・Option Bits・Encryption Keyを下記の通り変更し保存
します。
ここで設定したApplication ID・Channels Set・Encryption Keyは後で行う子機の設定で使います。
続いてRaspberry Piの設定を行います。
まずIoTデータをpublishするためのPythonスクリプトを作成します。
Pythonのサンプルスクリプト
をダウンロードし、上で作成したIoTルールのトピックに対してPublishするようMain_user.pyを修正しています。
今
回はAWS IoT Device SDK v2 for Pythonを使用しました
。
Main_user.py(抜粋) [ソースを展開]
import json
import sys

from awscrt import http, mqtt, exceptions
from awsiot import mqtt_connection_builder

host = "xxxxxxxxxxxxxx-ats.iot.ap-northeast-1.amazonaws.com" # AWSアカウントのデバイスデータエンドポイント
rootCAPath = "AmazonRootCA1.pem" # モノ作成時にダウンロードしたルートCA証明書
certificatePath = "xxxxxxxxxxxxxxxxxxxxxxxxxxxxxxxxxxxxxxxxxxxxxxxxxxxxxxxxxxxxxxxx-certificate.pem.crt" # モノ作成時にダウンロードしたデバイス証明書
privateKeyPath = "xxxxxxxxxxxxxxxxxxxxxxxxxxxxxxxxxxxxxxxxxxxxxxxxxxxxxxxxxxxxxxxx-private.pem.key" # モノ作成時にダウンロードしたプライベートキーファイル
port = 8883
clientId = "Room1" # IoTポリシーでConnect権限を付与したクライアントID
topic = "$aws/rules/openclose_timestream/room1/openclose" # IoTルールのトピック

(中略)

def Main(PAL=None):
    if isinstance(PAL, AppPAL):
        sns_data = PAL.GetDataDict()

        arrive_time = sns_data['ArriveTime'].strftime('%Y/%m/%d %H:%M:%S') + '.%06d'%(sns_data['ArriveTime'].microsecond)

        try:
            mqtt_connection = mqtt_connection_builder.mtls_from_path(
                endpoint=host,
                port=port,
                cert_filepath=certificatePath,
                pri_key_filepath=privateKeyPath,
                ca_filepath=rootCAPath,
                client_id=clientId,
                clean_session=False,
                keep_alive_secs=30)

            connect_future = mqtt_connection.connect()
            connect_future.result()

            is_closed = True
            if sns_data["HALLIC"] in [0,128]:
                is_closed = False

            message = {}
            message['LogicalID'] = sns_data['LogicalID']
            message['EndDeviceSID'] = sns_data['EndDeviceSID']
            message['IsClosed'] = is_closed
            message['Power(mV)'] = sns_data['Power']
            message['LQI'] = sns_data['LQI']
            message['ArriveTime'] = arrive_time
            messageJson = json.dumps(message)
            mqtt_connection.publish(
                topic=topic,
                payload=messageJson,
                qos=mqtt.QoS.AT_LEAST_ONCE)
            print('Published topic {}: {}'.format(topic, messageJson))

            disconnect_future = mqtt_connection.disconnect()
            disconnect_future.result()
        except exceptions.AwsCrtError as e:
            print(e)
最後に、Pythonスクリプトの自動起動設定をします。 今回はSystemdを利用して実行コマンドをサービス化しました。
これで、Raspberry Piの設定は完了です。
MONOSTICK REDをUSB接続しRaspberry Piの電源をつけると、Pythonスクリプトが自動起動するようになります。
以上で親機の設定は完了です。
子機設定
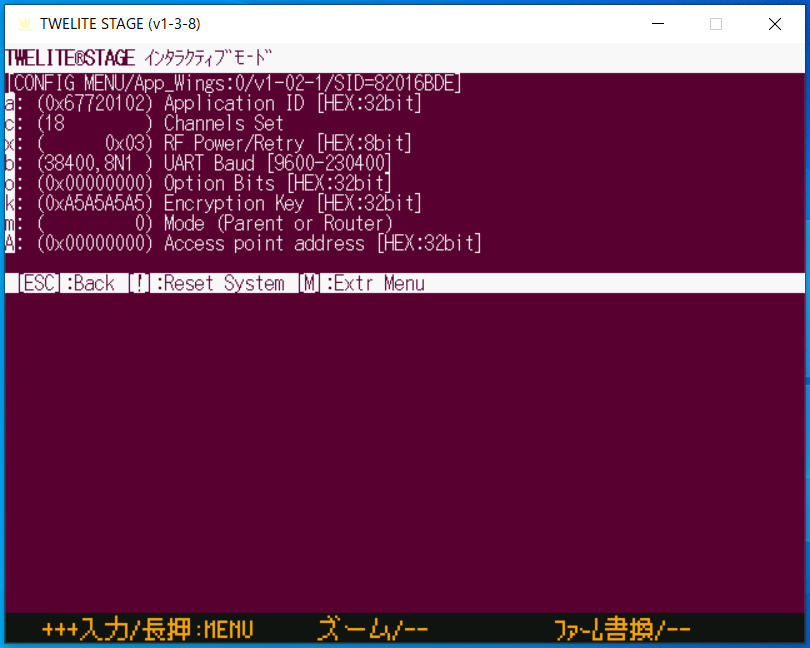
RED PALを接続したOPEN-CLOSE SENSE PALを、TWELITE Rを使って設定用PCにUSB接続します。
この時、OPEN-CLOSE SENSE PALのボタンスイッチを押下しながらUSB接続することで、インタラクティブモードで起動します。
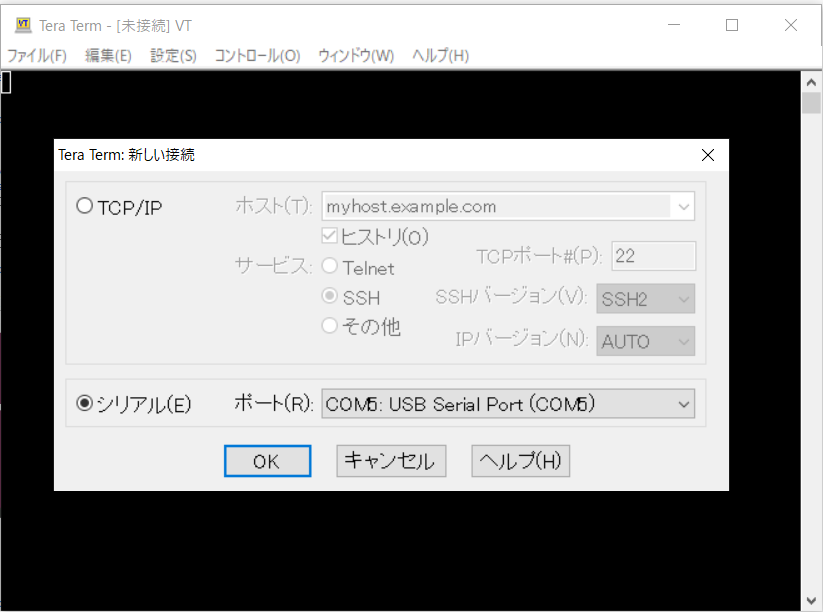
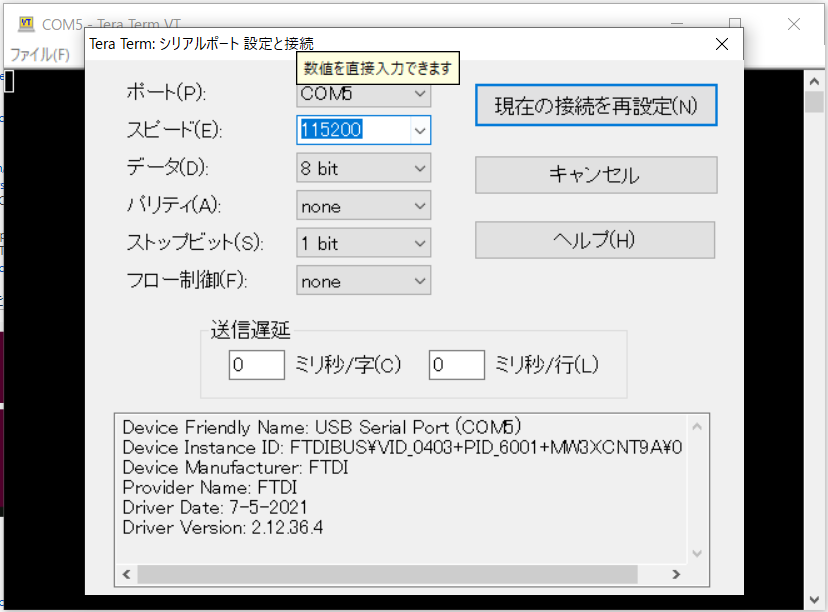
TeraTermでシリアル接続し、スピードを115200に設定します。
保存したらTeraTermを終了します。

以上の設定を各子機ごとに行い、子機の設定は完了です。
②開閉情報のクライアントアプリへの送信
DynamoDB設定
テーブルを作成します。
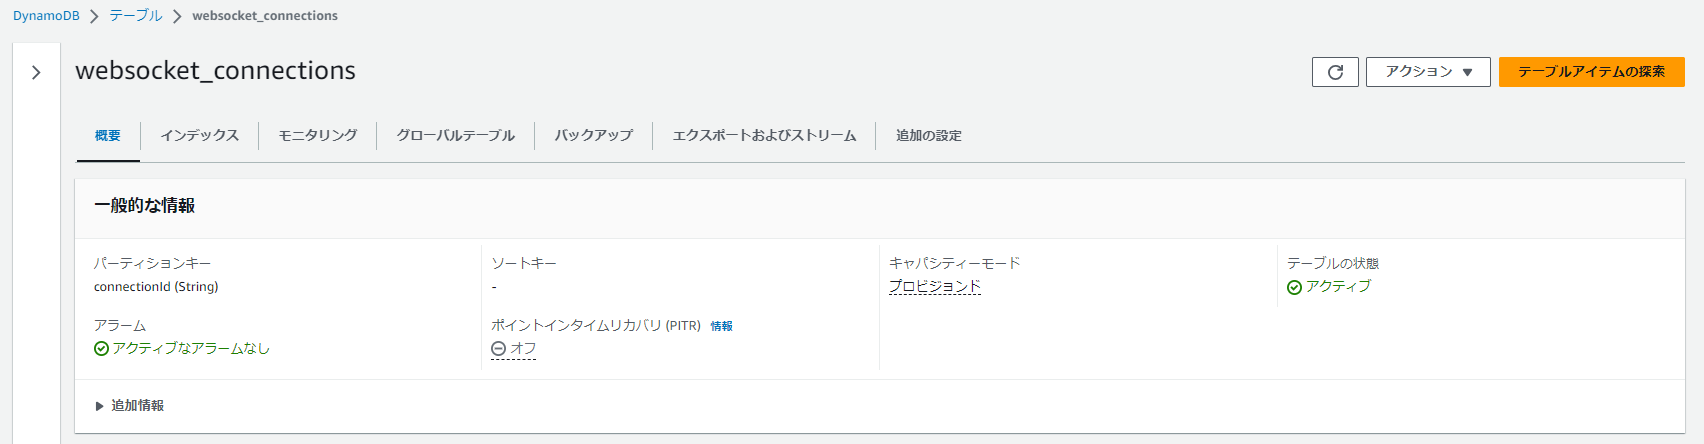
roomIdで検索できるようにするため、グローバルセカンダリインデックスを作成します。
以上でDynamoDBの設定は完了です。
Lambda設定
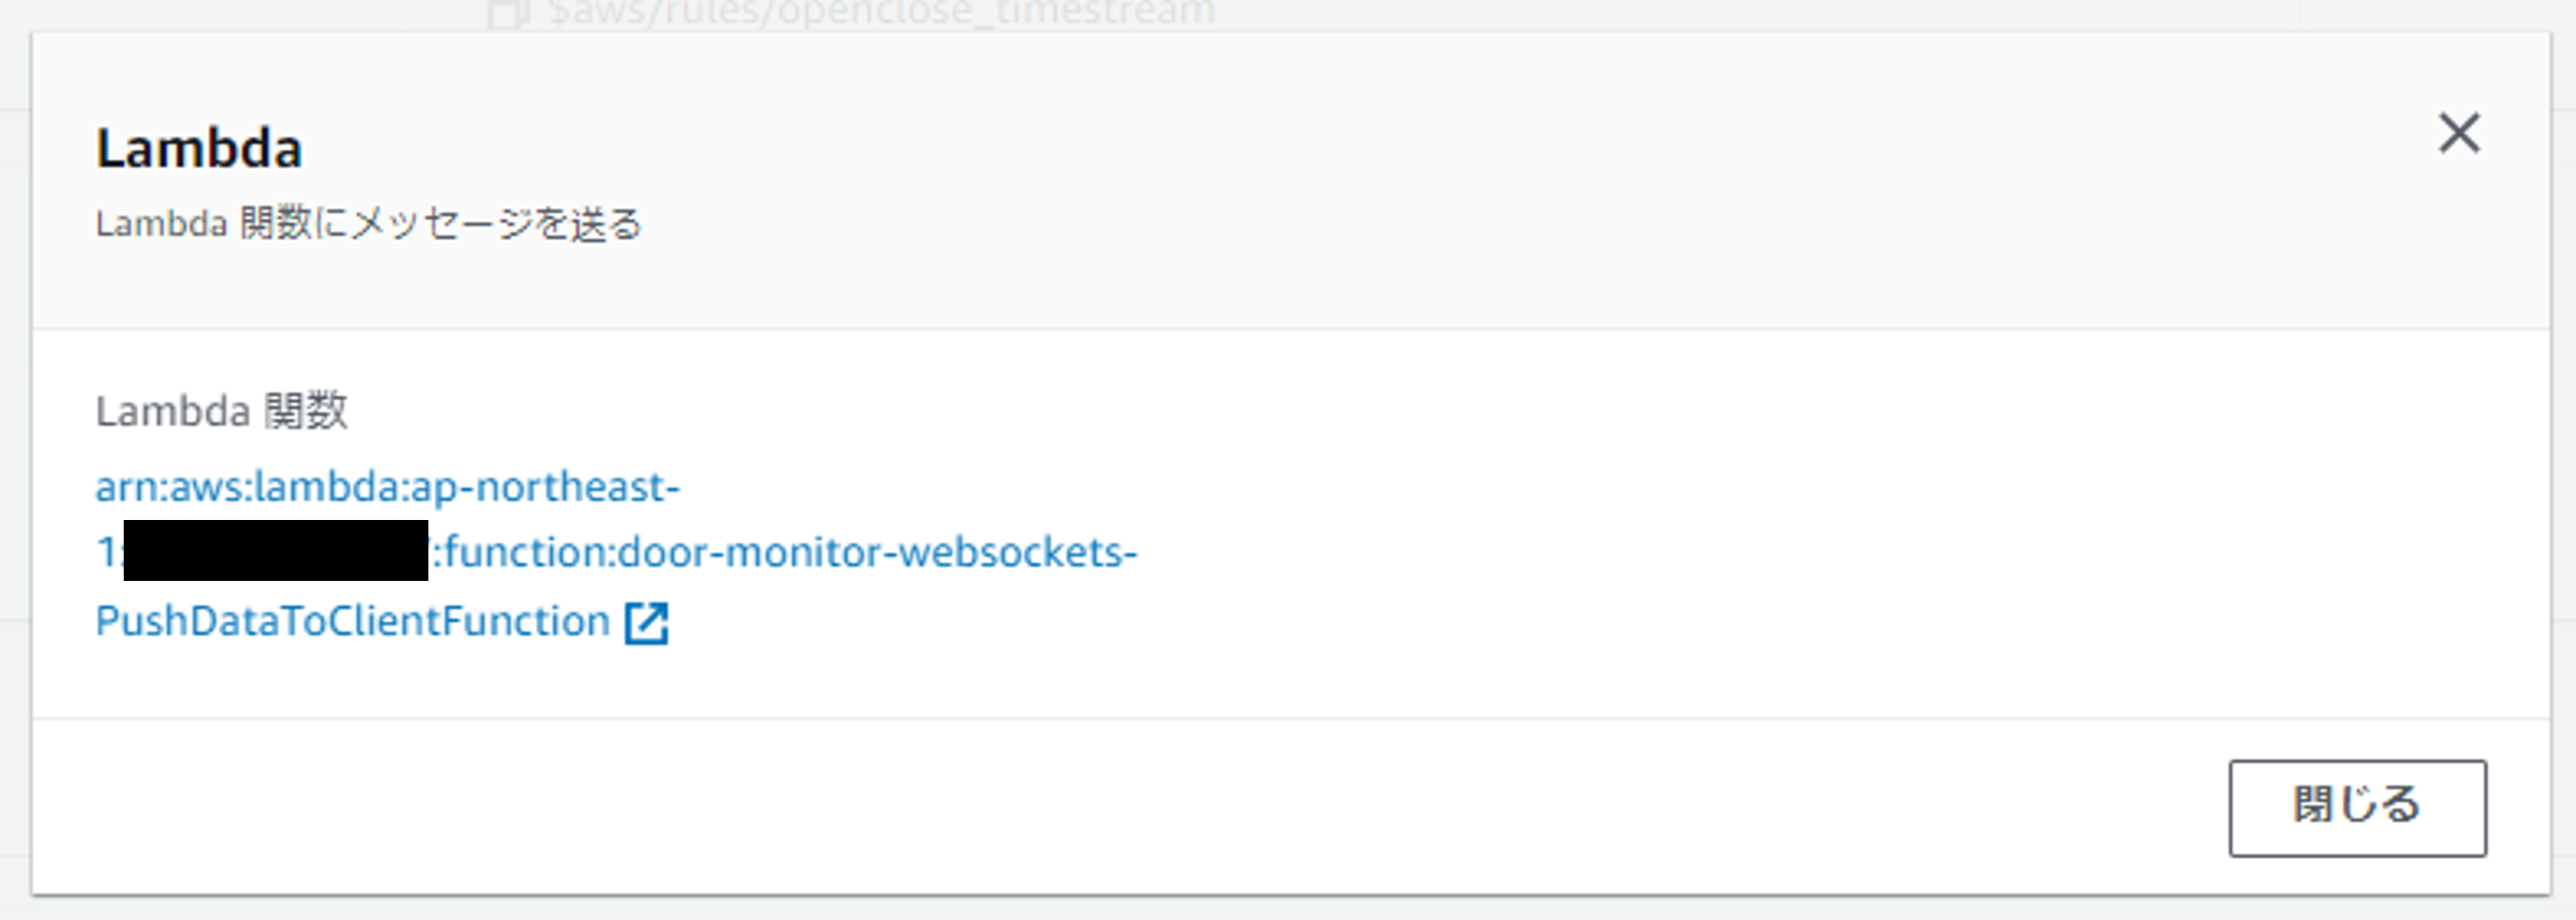
下記4つのLambda関数を作成します。
-
IoT Coreから呼び出されるLambda関数
- 3Dモデルを動かしているクライアントアプリに対して、@connectionsコマンドを使いリアルタイムに開閉情報を送信します
-
WebSocketAPIの$disconnectルートが呼び出すターゲットとなるLambda関数
- WebSocketが切断された際、DynamoDBからコネクションIDを削除します
-
WebSocketAPIの$connectルートが呼び出すターゲットとなるLambda関数
- WebSocketが接続された際、DynamoDBにコネクションIDを登録します
- その後、4のLambda関数を非同期で呼び出します
-
3のLambda関数から非同期で呼ばれるLambda関数
- Timestreamから現在の開閉情報を取得し、@connectionsコマンドを使い 3Dモデルを動かしているクライアントアプリに送信します
- 一度WebSocketコネクションを確立しないと開閉情報を送信できないため、3のLambda関数から非同期に呼び出しています
TABLE_NAMEやGSI_NAMEなどの環境変数には、上で作成済のAWSリソースの名称を設定します。API_STAGEには、次に作成するAPI Gatewayで設定した値を入れます。
今回ランタイムはNode.js 18.xとしました
。
1. IoT Coreから呼び出されるLambda関数 [ソースを展開]
import { DynamoDBClient, DeleteItemCommand, QueryCommand } from "@aws-sdk/client-dynamodb";
import { ApiGatewayManagementApiClient, PostToConnectionCommand } from "@aws-sdk/client-apigatewaymanagementapi";

const dynamoDBClient = new DynamoDBClient({ region: process.env.AWS_REGION });

export const handler = async event => {
  let connectionData;

  const queryInput = {
    TableName: process.env.TABLE_NAME,
    IndexName: process.env.GSI_NAME,
    KeyConditionExpression: 'roomId = :roomId',
    ExpressionAttributeValues: {
      ':roomId': { S: '' + event.RoomID }
    }
  };

  try {
    const queryCommand = new QueryCommand(queryInput);
    connectionData = await dynamoDBClient.send(queryCommand);
  } catch (err) {
    console.log(err);
    return { statusCode: 500, body: err.stack };
  }

  const apiGatewayManagementApiClient = new ApiGatewayManagementApiClient({
    region: process.env.AWS_REGION,
    endpoint: 'https://' + process.env.API_DOMAIN + '/' + process.env.API_STAGE
  });

  const postData = JSON.stringify(event);

  const postCalls = connectionData.Items.map(async ({ connectionId }) => {
    try {
      const postToConnectionCommandInput = {
        Data: postData,
        ConnectionId: connectionId.S,
      };
      const postToConnectionCommandCommand = new PostToConnectionCommand(postToConnectionCommandInput);
      await apiGatewayManagementApiClient.send(postToConnectionCommandCommand);
    } catch (err) {
      if (err.$metadata.httpStatusCode === 410) {
        console.log(`Found stale connection, deleting ${connectionId.S}`);
        const deleteItemInput = {
          TableName: process.env.TABLE_NAME,
          Key: {
            'connectionId': connectionId
          }
        };
        const deleteItemCommand = new DeleteItemCommand(deleteItemInput);
        await dynamoDBClient.send(deleteItemCommand);
      } else {
        throw err;
      }
    }
  });

  try {
    await Promise.all(postCalls);
  } catch (err) {
    console.log(err);
    return { statusCode: 500, body: err.stack };
  }

  return { statusCode: 200, body: 'Data sent.' };
};
2. WebSocketAPIの$disconnectルートが呼び出すターゲットとなるLambda関数 [ソースを展開]
import { DynamoDBClient, DeleteItemCommand } from "@aws-sdk/client-dynamodb";

const client = new DynamoDBClient({ region: process.env.AWS_REGION });

export const handler = async event => {
  const input = {
    TableName: process.env.TABLE_NAME,
    Key: {
      'connectionId': { S: event.requestContext.connectionId }
    }
  };

  try {
    const command = new DeleteItemCommand(input);
    await client.send(command);
  } catch (err) {
    console.log(err);
    return { statusCode: 500, body: 'Failed to disconnect: ' + JSON.stringify(err) };
  }

  return { statusCode: 200, body: 'Disconnected.' };
};
3. WebSocketAPIの$connectルートが呼び出すターゲットとなるLambda関数 [ソースを展開]
import { DynamoDBClient, PutItemCommand } from "@aws-sdk/client-dynamodb";
import { LambdaClient, InvokeCommand } from "@aws-sdk/client-lambda";

const client = new DynamoDBClient({ region: process.env.AWS_REGION });

export const handler = async event => {
  const input = {
    TableName: process.env.TABLE_NAME,
    Item: {
      'connectionId': { S: event.requestContext.connectionId },
      'roomId': { S: event.queryStringParameters.roomId }
    }
  };

  try {
    const command = new PutItemCommand(input);
    await client.send(command);
  } catch (err) {
    console.log(err);
    return { statusCode: 500, body: 'Failed to connect: ' + JSON.stringify(err) };
  }

  try {
    let payload = {};
    payload['connectionId'] = event.requestContext.connectionId;
    payload['roomId'] = event.queryStringParameters.roomId;

    const lambdaClient = new LambdaClient({ region: process.env.AWS_REGION });
    const invokeCommandInput = {
      FunctionName: process.env.PUSH_INITIAL_DATA_LAMBDA,
      InvocationType: "Event",
      Payload: JSON.stringify(payload),
    };
    const invokeCommand = new InvokeCommand(invokeCommandInput);
    const response = await lambdaClient.send(invokeCommand);
  } catch (err) {
    console.log(err);
    return { statusCode: 500, body: 'Failed to connect: ' + JSON.stringify(err) };
  }

  return { statusCode: 200, body: 'Connected.' };
};
4. 3のLambda関数から呼ばれるLambda関数 [ソースを展開]
import { TimestreamQueryClient, QueryCommand } from "@aws-sdk/client-timestream-query";
import { ApiGatewayManagementApiClient, PostToConnectionCommand } from "@aws-sdk/client-apigatewaymanagementapi";

export const handler = async event => {
  const connectionId = event.connectionId;
  const roomId = event.roomId;

  const timestreamQueryClient = new TimestreamQueryClient({ region: process.env.AWS_REGION });
  try {
    const input = {
      QueryString: `
        WITH latest_ts AS(
          SELECT
            RoomID,
            LogicalID,
            MAX(time) AS latest_timestamp
          FROM
            iotDatabase.openclose
          WHERE
            RoomID = '` + roomId + `'
          GROUP BY
            RoomID,
            LogicalID
        )
        SELECT
          oc.RoomID AS roomId,
          oc.LogicalID,
          ARBITRARY(
            CASE
              WHEN oc.measure_name = 'ArriveTime' THEN oc.measure_value::varchar
              ELSE NULL
            END
          ) AS ArriveTime,
          ARBITRARY(
            CASE
              WHEN oc.measure_name = 'IsClosed' THEN oc.measure_value::boolean
              ELSE NULL
            END
          ) AS IsClosed
        FROM
          iotDatabase.openclose oc
          JOIN
            latest_ts AS lts
          ON  lts.RoomID = oc.RoomID
          AND lts.LogicalID = oc.LogicalID
          AND lts.latest_timestamp = oc.time
        WHERE
          oc.measure_name IN('ArriveTime', 'IsClosed')
        GROUP BY
          oc.RoomID,
          oc.LogicalID
        ORDER BY
          oc.RoomID,
          oc.LogicalID
      `
    };
    const queryCommand = new QueryCommand(input);
    const response = await timestreamQueryClient.send(queryCommand);

    const columns = response.ColumnInfo.map(c => c.Name);

    const apiGatewayManagementApiClient = new ApiGatewayManagementApiClient({
      region: process.env.AWS_REGION,
      endpoint: 'https://' + process.env.API_DOMAIN + '/' + process.env.API_STAGE
    });

    const postCalls = response.Rows.map(async r => {
      let row = {}
      r.Data.forEach((d, i) => {
        try {
          row[columns[i]] = JSON.parse(d.ScalarValue);
        } catch (err) {
          row[columns[i]] = d.ScalarValue;
        }
      });

      const postData = JSON.stringify(row);

      const postToConnectionCommandInput = {
        Data: postData,
        ConnectionId: connectionId,
      };
      const postToConnectionCommandCommand = new PostToConnectionCommand(postToConnectionCommandInput);
      await apiGatewayManagementApiClient.send(postToConnectionCommandCommand);

    });

    await Promise.all(postCalls);

  } catch (err) {
    console.log(err);
    return { statusCode: 500, body: 'Failed to send initial data: ' + JSON.stringify(err) };
  }

  return { statusCode: 200, body: 'Initial data sent.' };
};
IoT Coreのルールに、1のLambda関数を呼び出すactionを追加します。
以上でLambdaの設定は完了です。
API Gateway設定
WebSocket APIを作成します。 $connectルートと$disconnectルートを追加し、$connectの統合と$disconnectの統合で上で作成したLambda関数を設定します。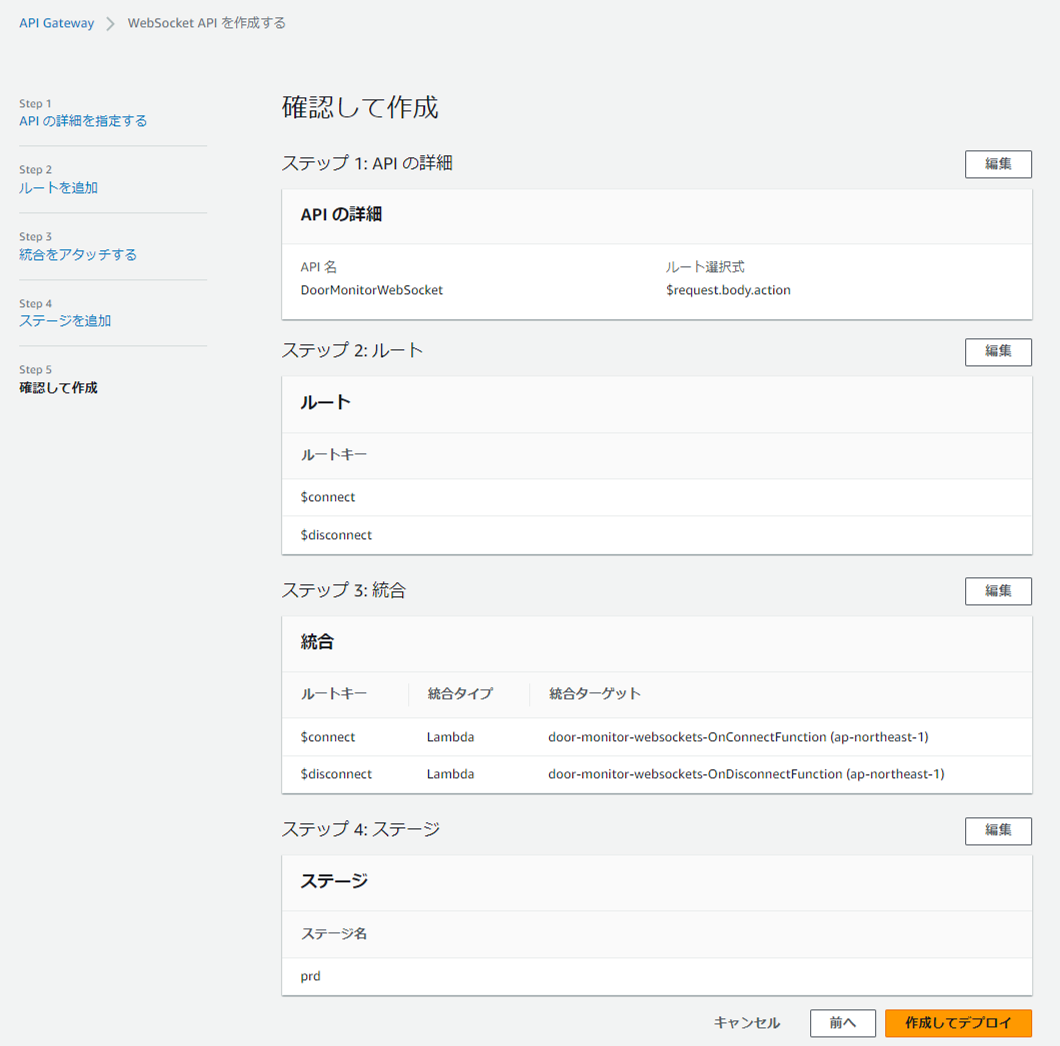
以上でAPI Gatewayの設定は完了です。
③3Dモデル作成
Blenderでの3Dモデル構築
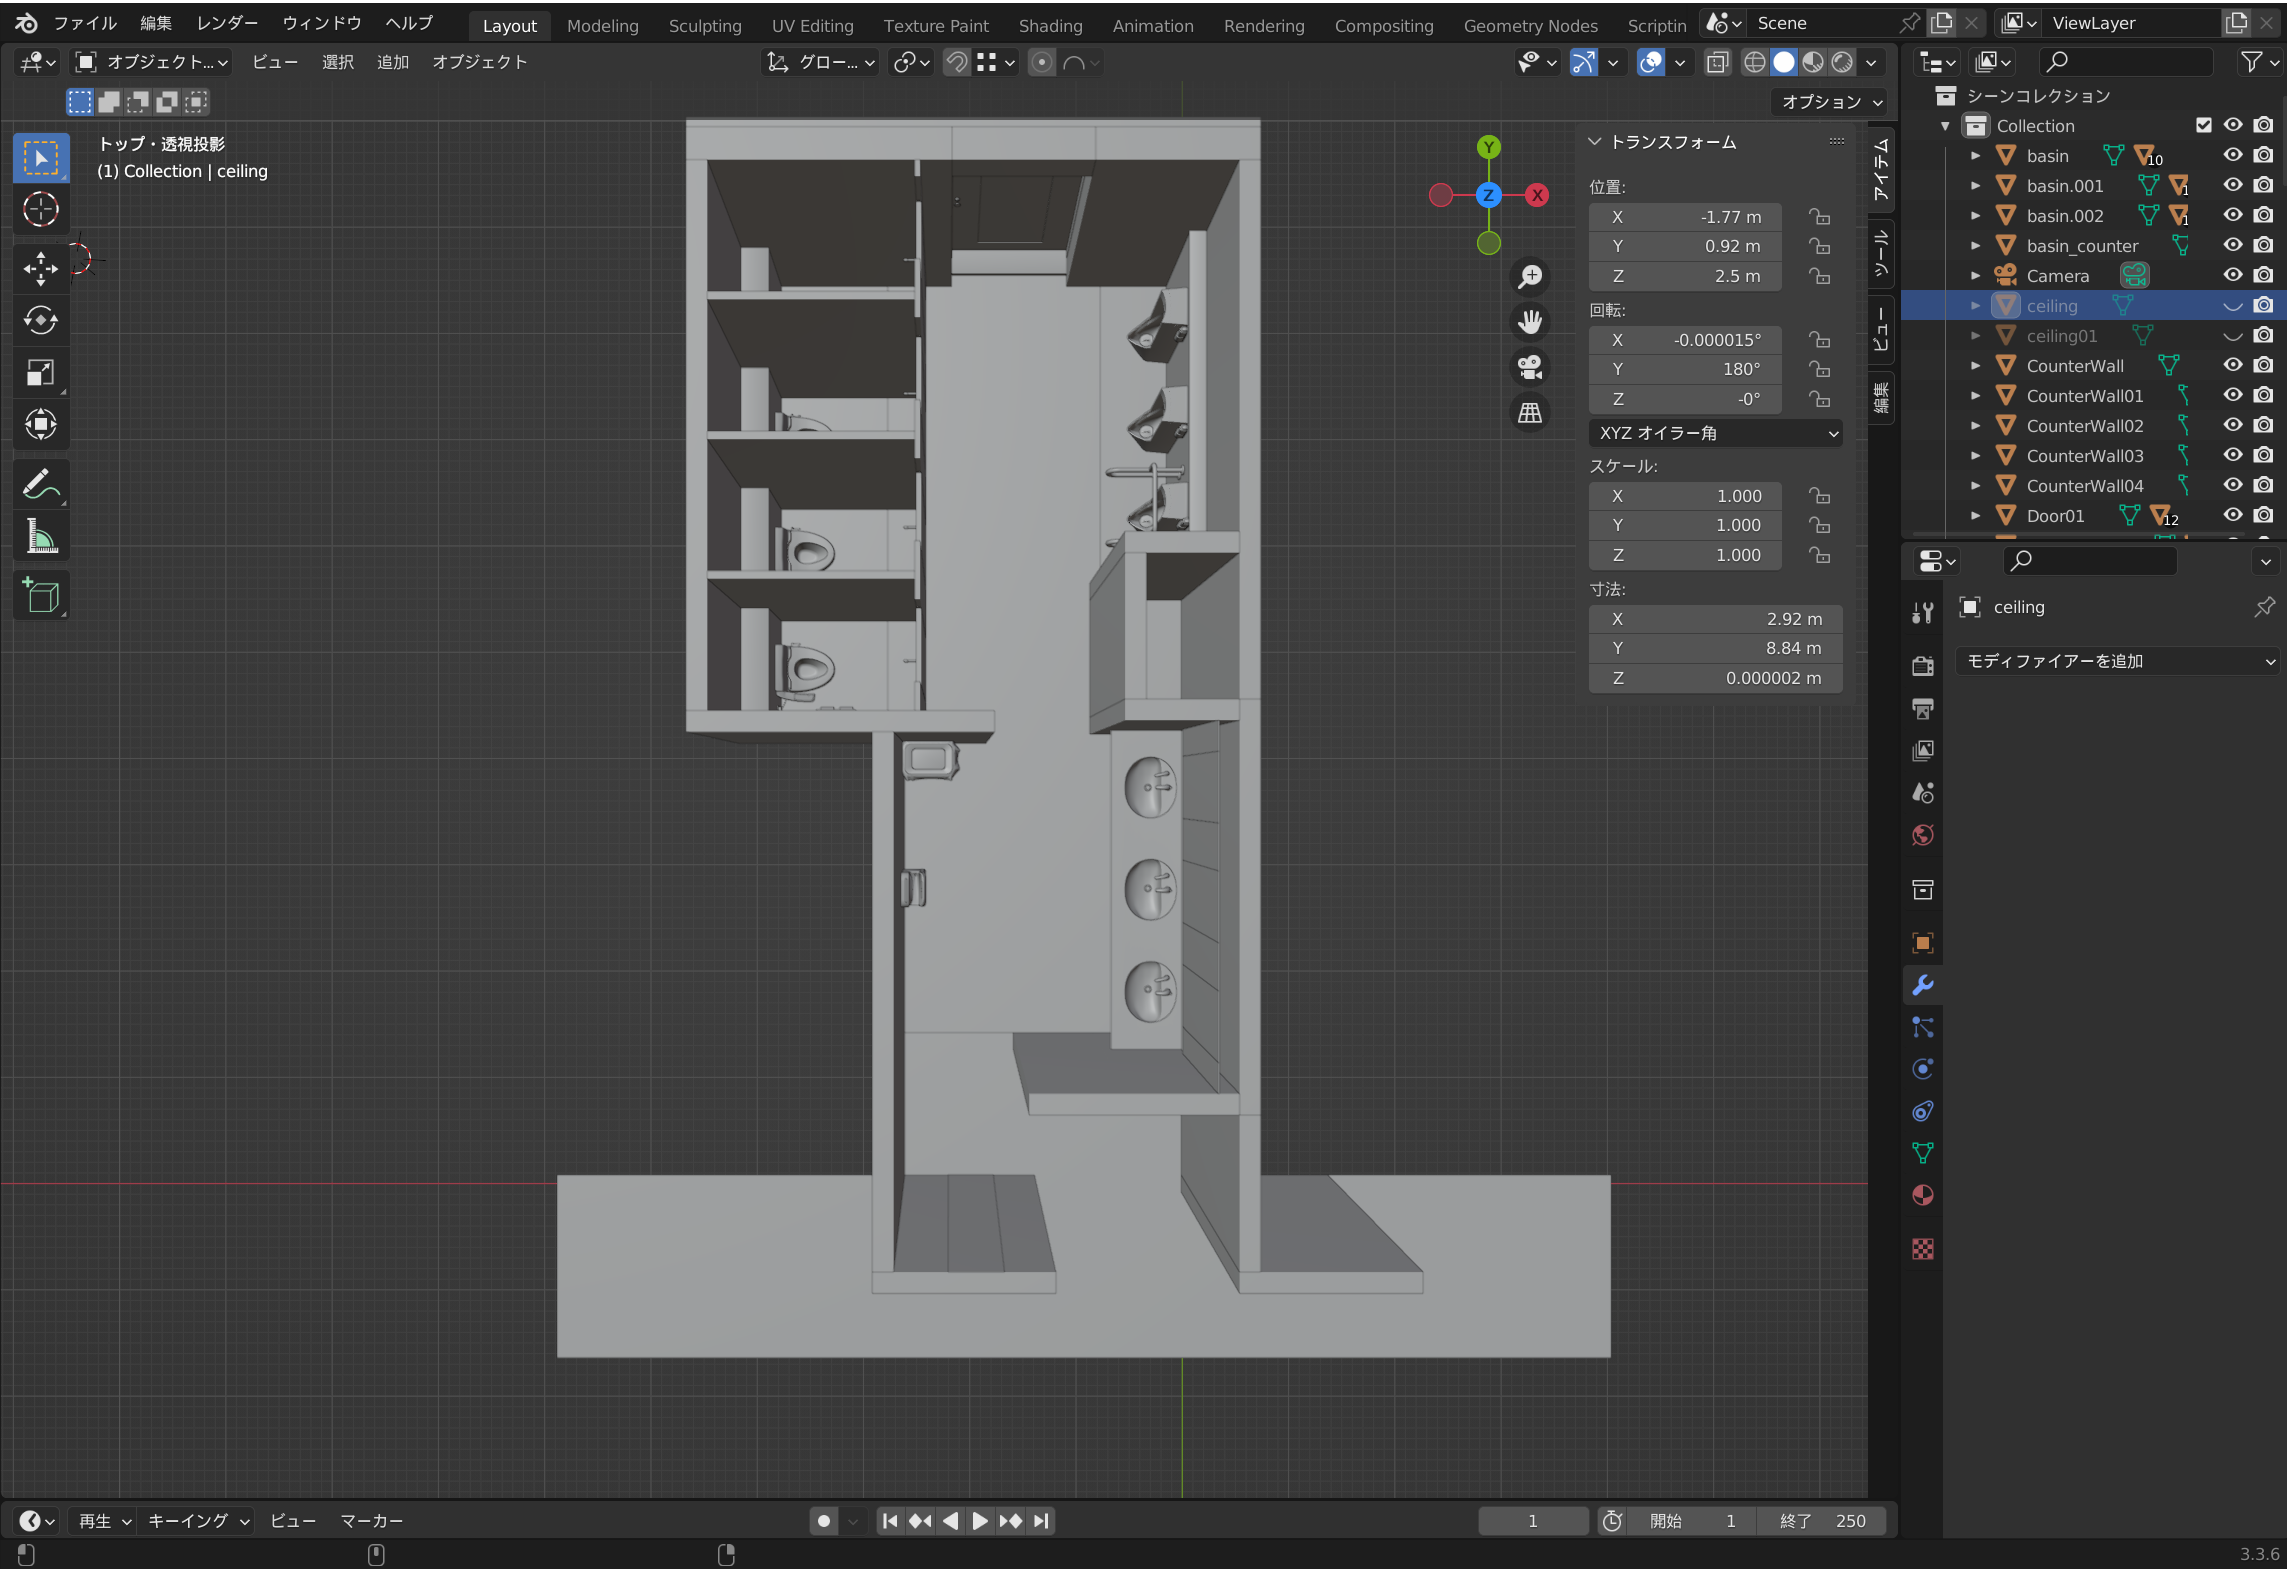
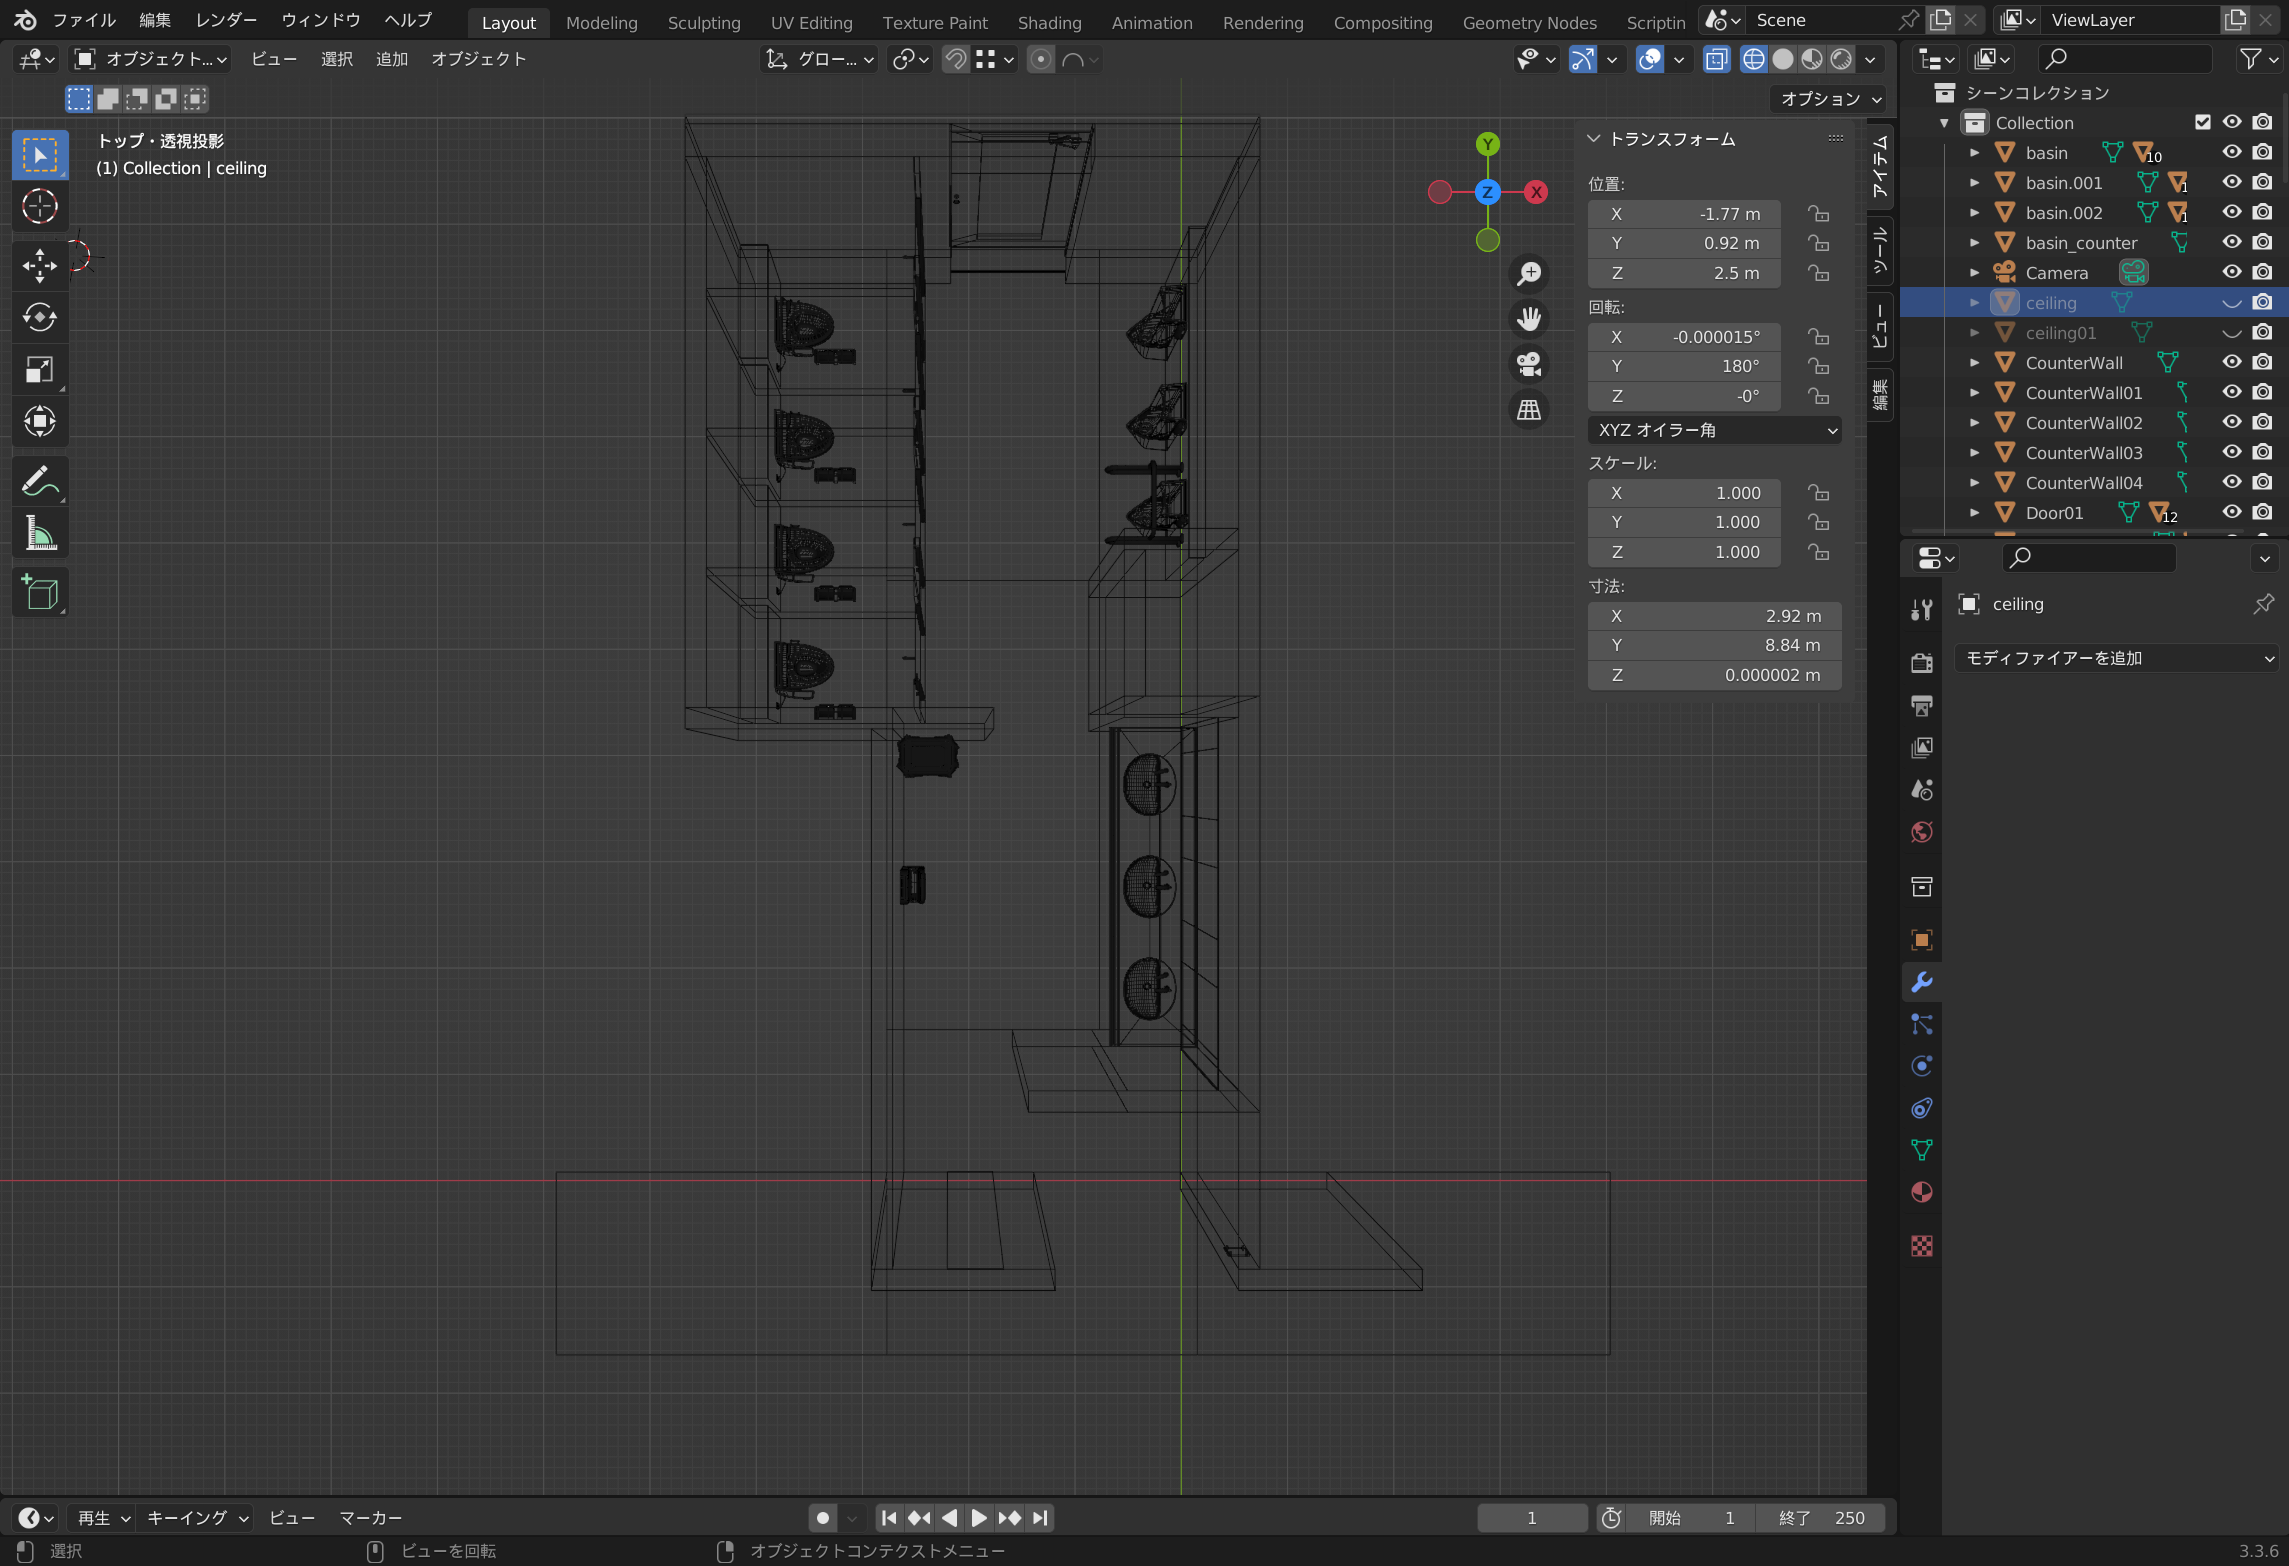
3Dモデルはオープンソースの3DCGモデリングツールであるBlenderを利用して制作しています。
今回は実際の私たちのオフィスのトイレをそのまま再現するため、既存のアセットなどは利用せず、そのほとんどを0からモデリングしています。
Unityでのモデル色付け
3Dモデルに対する色付け(マテリアルの設定)やライティング設定はUnity側で行っています。
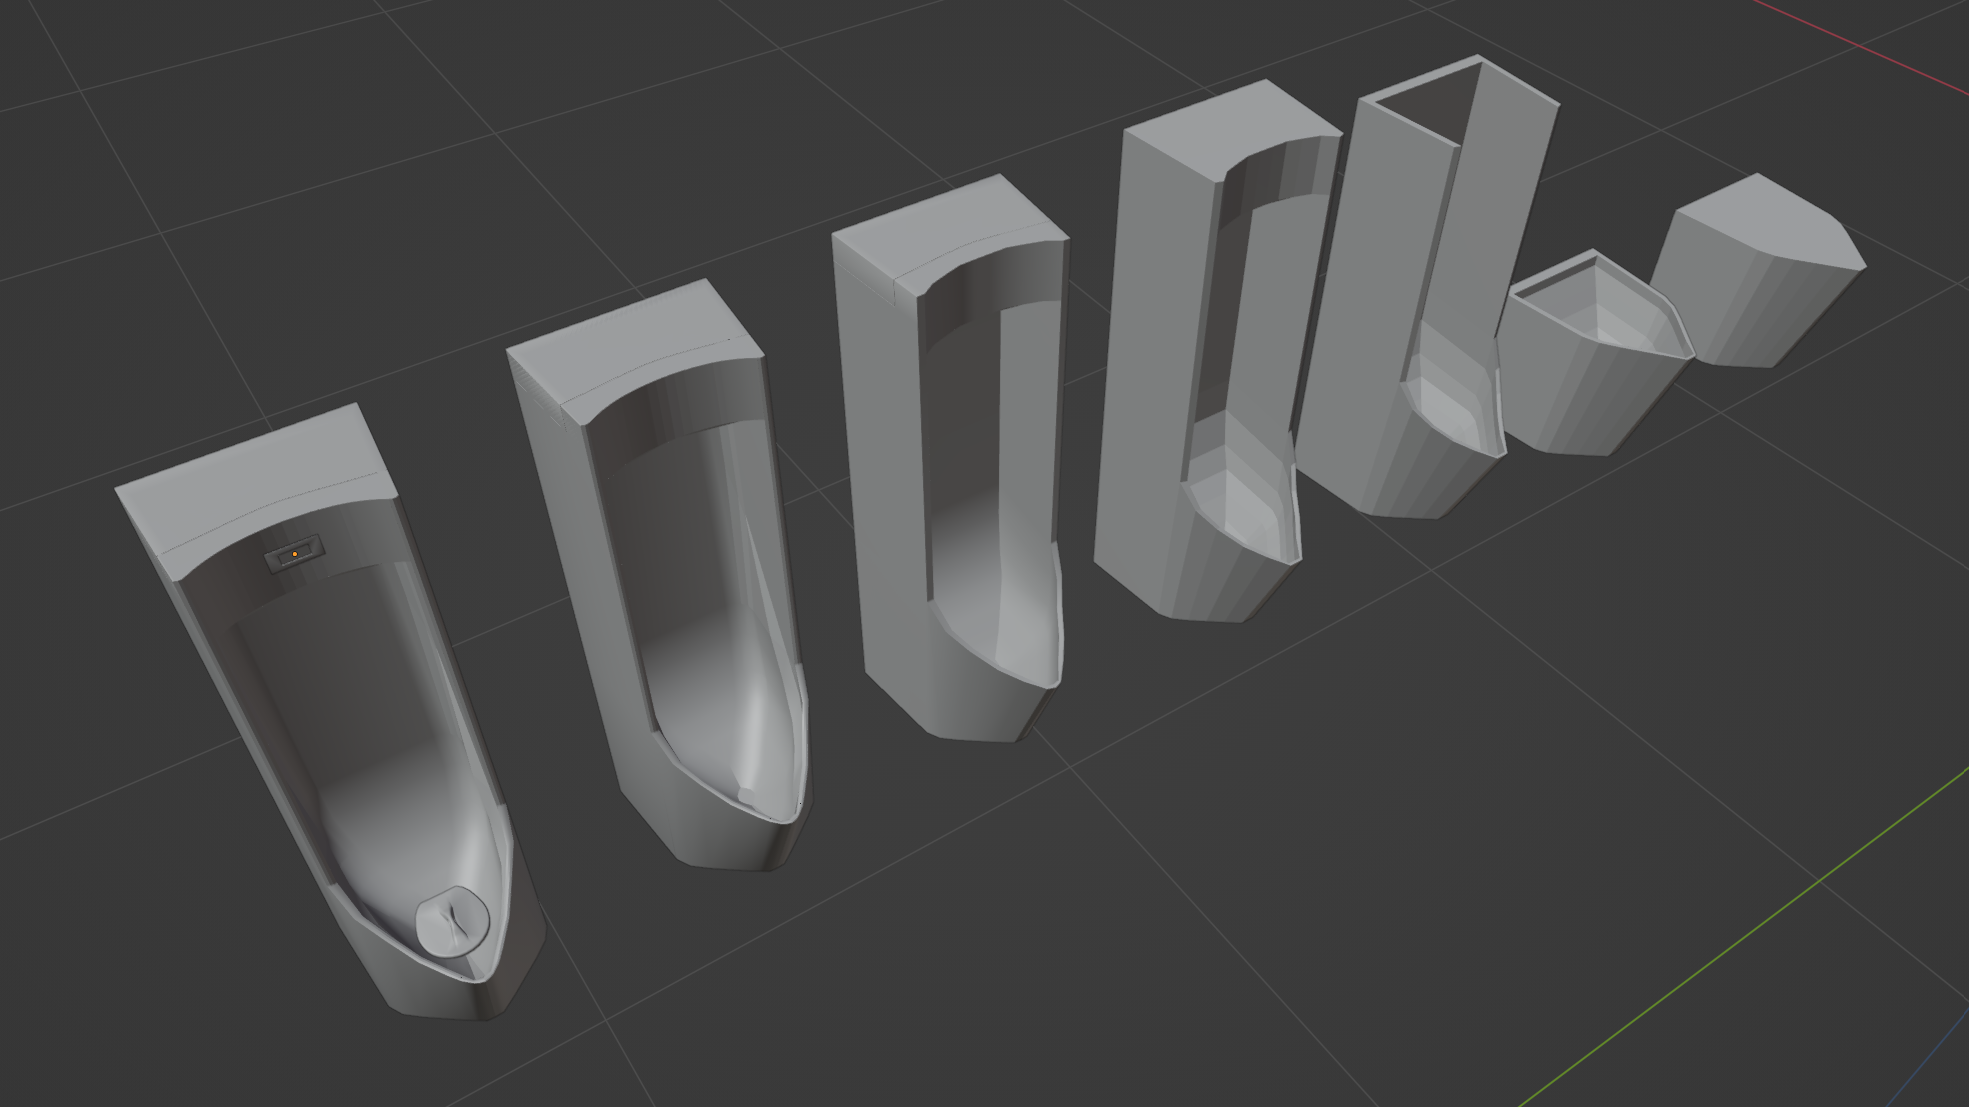
左から、取り込み直後、ライティング設定後、マテリアル設定後です。
Unityでの動き付与
ここからは作成したモデルに処理を追加して、現実のトイレのドアの動きに合わせて仮想空間上のドアも動くようにしていきます。
さらに「デジタルツイン」ということで、現実空間ではできない表現もしたいので
、空間に「ドアが閉まっている時間」を表示するようにもします。
まとめると以下2つの機能を実装します。
- ドアをリアルタイムで開閉する機能
- 閉まっている時間を表示する機能
そのために以下の処理をUnity上で実装していきます。
- WebSocket APIに接続し、センサーデータを受信する処理
- 受信したセンサーデータの内容によってUnityのオブジェクトを操作する処理
1. WebSocket APIに接続し、センサーデータを受信する処理
Unity上でゲーム内でスクリプトを実行する場合には、シーン内のオブジェクトにC#スクリプトをアタッチする必要があります。
センサーデータの受信の処理は特定のオブジェクトを操作するというよりはゲーム内全体の動作に関わる処理のため、空のオブジェクトを作成してそこにアタッチしていきます。
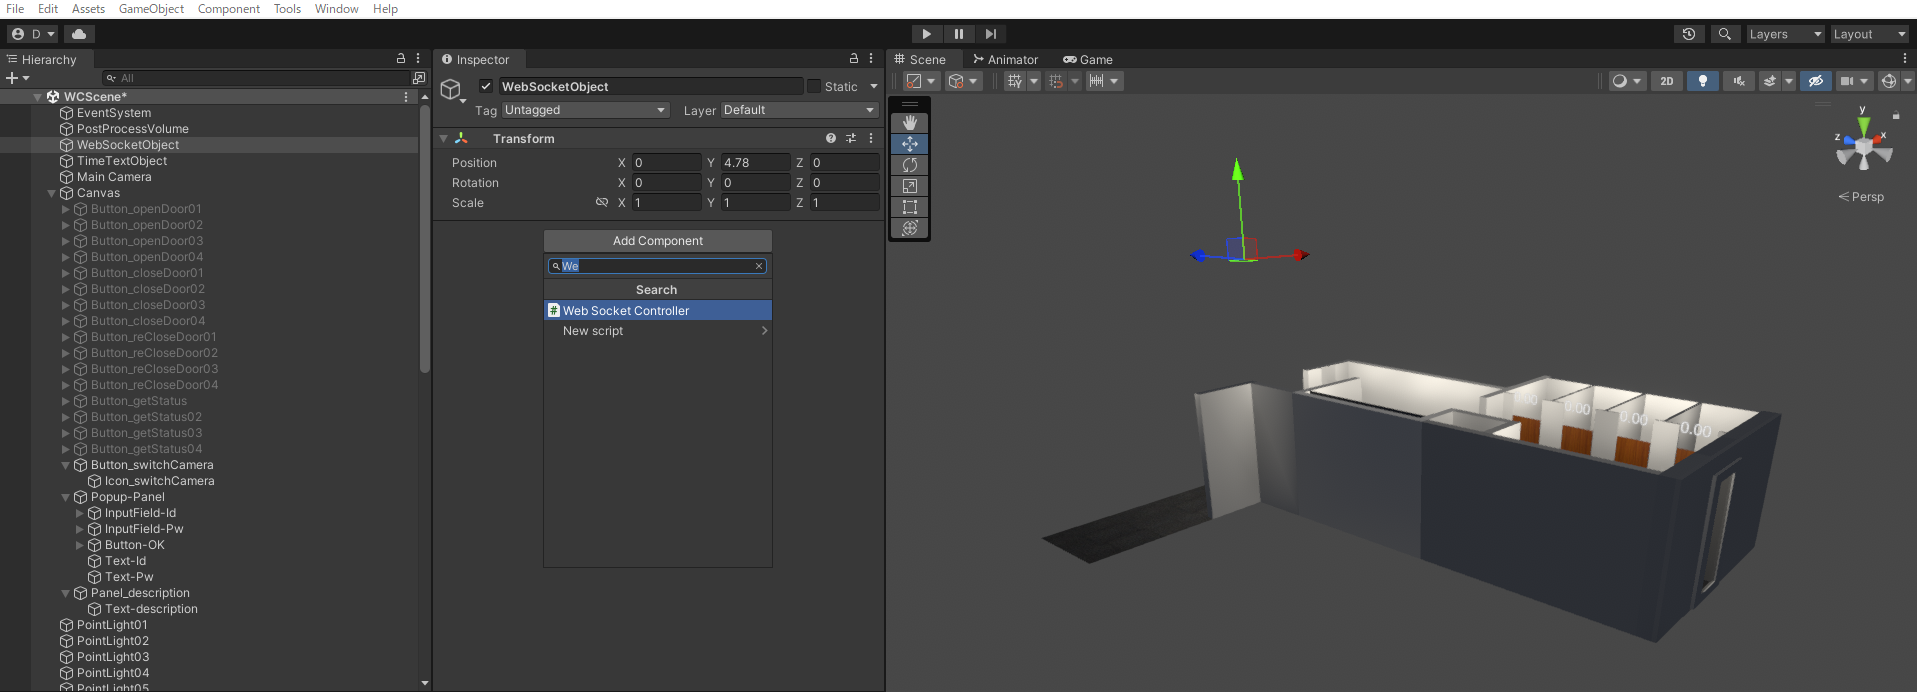
アタッチするスクリプト内では以下の処理を行っています。
a. WebSocketのコネクションの確立
b. 受信したセンサーデータのパース
c. データ中のドアIDに応じてドアを開閉する処理の呼び出し
実際のスクリプトは以下です。
WebSocketController.cs [ソースを展開]
using UnityEngine;
using UnityEngine.UI;
using System;
using System.Collections;
using System.Collections.Generic;
using WebSocketSharp;

public class WebSocketController : MonoBehaviour
{
    public GameObject door;
    private WebSocket ws;
    private Queue <string> messageQueue = new Queue <string>();
    private bool isProcessing = false;

    private string receivedMessage;
    public DateTime sensorTime;

    [System.Serializable]
    public class ResponseData
    {
        public string LogicalID;
        public string ArriveTime;
        public bool IsClosed;
    }

    private static WebSocketController instance;
    public static WebSocketController Instance { get { return instance; } }

    private void Awake()
    {
        if (instance != null &&instance != this)
        {
            Destroy(this.gameObject);
        }
        else
        {
            instance = this;
        }
    }

    public void StartGame()
    {
        // a. WebSocketのコネクションの確立
        ws = new WebSocket("wss://xxxxxxxxxxxxxxxxx.ap-northeast-1.amazonaws.com/prd?roomId=1");
        ws.OnOpen += (sender, e) =>
        {
            Debug.Log("WebSocket Open");
        };
        ws.OnMessage += OnWebSocketMessage;
        ws.Connect();

		// 受信データを順番に捌く処理を起動
        StartCoroutine(ProcessMessageQueue());
    }

	// 受信データを順番に捌く関数
    private IEnumerator ProcessMessageQueue()
    {
        while (true)
        {
            if (!isProcessing &&messageQueue.Count > 0)
            {
                isProcessing = true;

                string message = messageQueue.Dequeue();
				// 受信メッセージからドアの状態を取得する処理を起動
                StartCoroutine(GetDoorStatusCoroutine(message));

                yield return new WaitForSeconds(2f);

                isProcessing = false;
            }

            yield return null;
        }
    }

	// 受信メッセージからドアの状態を取得する関数
    private IEnumerator GetDoorStatusCoroutine(string message)
    {
        isProcessing = true;
        bool doorStatus = false;
        string responseText = message;
        Debug.Log("responseText" + responseText);

        // b. 受信したセンサーデータのパース
        ResponseData responseData = JsonUtility.FromJson <ResponseData>(responseText);
        string doorId = responseData.LogicalID; // ドアID
        sensorTime = DateTime.Parse(responseData.ArriveTime); // センサーの時間
        doorStatus = responseData.IsClosed; // ドアのステータス

        // c. データ中のドアIDに応じてドアを開閉する処理の呼び出し
        if (doorId == "1")
        {
            DoorController01.instance.SetDoorStatus(doorStatus,sensorTime);
        } else if (doorId == "2")
        {
            DoorController02.instance.SetDoorStatus(doorStatus,sensorTime);
        } else if (doorId == "3")
        {
            DoorController03.instance.SetDoorStatus(doorStatus,sensorTime);
        } else if (doorId == "4")
        {
            DoorController04.instance.SetDoorStatus(doorStatus,sensorTime);
        } else
        {
            Debug.Log("wrong id");
        }
        yield return null;
        isProcessing = false;
    }

    private void OnWebSocketMessage(object sender, MessageEventArgs e)
    {
        if (e.IsBinary)
        {
            Debug.Log("WebSocket Binary Message Received");
        }
        else
        {
            Debug.Log("WebSocket Text Message Received: " + e.Data);
            messageQueue.Enqueue(e.Data);
        }
    }

        void OnDestroy()
    {
        ws.Close();
        ws = null;
    }
}
UnityのC#スクリプト実行環境にはWebSocket通信をしてくれるライブラリはデフォルトでは入っていないので、 websocket-sharp
というライブラリを追加しています。
WebSocketの接続部分では先ほどAPI Gatewayで作成したエンドポイントにアクセスします。
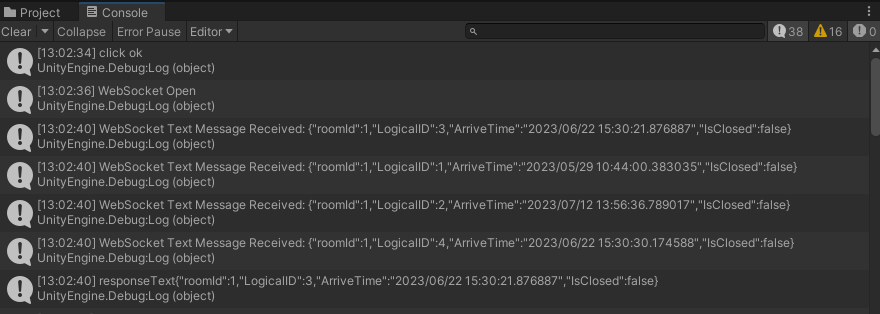
この状態で実行すると無事にセンサーデータが受信できていることが確認できます。
2. 受信したセンサーデータの内容によってUnityのオブジェクトを操作する処理
次に、受信したセンサーデータの内容を見て、Unity上に作成した仮想空間のオブジェクトを操作していきます。
主たる動作は以下の2つです。
- センサーデータの状態を見てドアを開閉させる
- ドアが閉まっている時間を空間に表示させる
ドアのオブジェクトにスクリプトをアタッチし、以下処理を記載します。
a. データの受信時刻とドアの状態を受け取り、ドアのオブジェクトの開閉を制御する。
b. データの受信時刻と現在時刻の差分を計算し、ドアが閉まってから現在までの時間を算出する。
c. ドアが「開」から「閉」になったときだけ空間に時間を表示させる。
実際のスクリプトは以下です。
DoorController01.cs [ソースを展開]
using System;
using System.Collections;
using System.Collections.Generic;
using UnityEngine;
using UnityEngine.UI;
using TMPro;

public class DoorController01 : MonoBehaviour
{
    public GameObject door;
    public Transform doorTransform;
    public Quaternion closedRotation = Quaternion.Euler(-90, 0, -90);
    public Quaternion openedRotation = Quaternion.Euler(-90, 0, 0);
    private bool isDoorClosed;

    public GameObject stopwatch;
    public DateTime sensorTime;
    private TimeSpan elapsedTime;
    private bool isStopwatchOn;

    public static DoorController01 instance;

    public void Awake()
    {
        if(instance == null)
        {
            instance = this;
        }
    }

    // 起動時に呼び出される関数
    void Start()
    {
        isDoorClosed = true;
        isStopwatchOn = false;
        doorTransform = GetComponent <Transform>();
        doorTransform.rotation = closedRotation;
        stopwatch.SetActive(false);
    }

    // 毎フレーム呼び出される関数
    private void Update()
    {
        // b. データの受信時刻と現在時刻の差分を計算し、ドアが閉まってから現在までの時間を算出する。
        if (isStopwatchOn)
        {
            elapsedTime = DateTime.Now - sensorTime;
            if (elapsedTime.TotalHours >= 1)
            {
                stopwatch.GetComponent <TextMeshPro>().text = elapsedTime.ToString(@"hh\:mm\:ss");
            }
            else
            {
                stopwatch.GetComponent <TextMeshPro>().text = elapsedTime.ToString(@"mm\:ss");
            }
        }
    }

    // a. データの受信時刻とドアの状態を受け取り、ドアのオブジェクトの開閉を制御する。
    public void SetDoorStatus(bool doorStatus, DateTime time)
    {

        // "前回データより新しいデータを受信"かつ"ドアの状態に変化があった"場合にドア開閉処理を実行
        if (sensorTime <time &&doorStatus != isDoorClosed)
        {
            sensorTime = time;
            isDoorClosed = doorStatus;
            if (!isDoorClosed)
            {
                OpenDoor();
            }
            else
            {
                CloseDoor();
            }
        }
    }

    //ドアを開く関数
    void OpenDoor()
    {
        Debug.Log("isDoorClosed:" + isDoorClosed);
        if (!isDoorClosed)
        {
            // 開く処理
            StartCoroutine(OpenDoorCoroutine());
            // 開いたら経過時間は表示しない
            isStopwatchOn = false;
            stopwatch.SetActive(false);
        }
    }

    // ドアを開く処理
    IEnumerator OpenDoorCoroutine()
    {
        Quaternion fromRotation = door.transform.rotation;
        Quaternion toRotation = openedRotation;
        float duration = 1.0f;
        float elapsed = 0.0f;

        while (elapsed <duration)
        {
            door.transform.rotation = Quaternion.Slerp(fromRotation, toRotation, elapsed / duration);
            elapsed += Time.deltaTime;

            float t = elapsed / duration;
            door.transform.rotation = ClampRotation(door.transform.rotation, t);

            yield return null;
        }

        door.transform.rotation = toRotation;
        isDoorClosed = false;
    }

    //ドアを閉じる関数
    void CloseDoor()
    {
        if (isDoorClosed)
        {
            // 閉じる処理
            StartCoroutine(CloseDoorCoroutine());

            // c. ドアが「開」から「閉」になったときだけ空間に時間を表示させる
            isStopwatchOn = true;
            stopwatch.SetActive(true);
        }
    }

    //ドアを閉じる処理
    IEnumerator CloseDoorCoroutine()
    {
        Quaternion fromRotation = door.transform.rotation;
        Quaternion toRotation = closedRotation;
        float duration = 1.0f;
        float elapsed = 0.0f;

        while (elapsed <duration)
        {
            door.transform.rotation = Quaternion.Slerp(fromRotation, toRotation, elapsed / duration);
            elapsed += Time.deltaTime;

            float t = elapsed / duration;
            door.transform.rotation = ClampRotation(door.transform.rotation, t);

            yield return null;
        }

        door.transform.rotation = toRotation;
        isDoorClosed = true;
    }

    // ドアの回転の制御
    Quaternion ClampRotation(Quaternion rotation, float t)
    {
        Quaternion clampedRotation = rotation;
        Vector3 euler = clampedRotation.eulerAngles;

        Quaternion minRotation = Quaternion.Euler(-90f, 0f, 0f);
        Quaternion maxRotation = Quaternion.Euler(-90f, 0f, -90f);
        Quaternion targetRotation = Quaternion.Lerp(minRotation, maxRotation, t);

        if (Quaternion.Angle(rotation, targetRotation) > 0.01f)
        {
            clampedRotation = Quaternion.RotateTowards(rotation, targetRotation, 1f);
        }
        return clampedRotation;
    }
1度WebSocketのコネクションを張ると、「ドアの状態に変化があったとき」と「60秒に1回」のタイミングでデータを受信します。
そのため、センサーから受信したデータを見て、ドアの開閉状況に変化があったときだけドアの開閉やタイマー時刻の再設定処理を行うようにしています。
また、受信するデータは順序性が担保されていないため、前回の受信データよりも新しいデータを受け取ったときのみ各種処理を走らせるよう考慮しています。
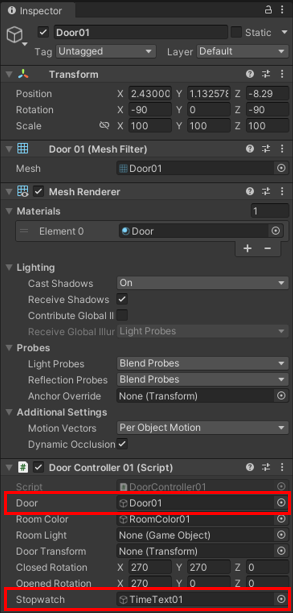
オフィスのトイレにはドアが4つあるのですが、並列処理などを簡素化するために同一のスクリプトを複製し01~04として、各ドアにアタッチしています。
また、各個室の占有状況を把握したいのでタイマーのオブジェクトも4つ配置します。
スクリプトから制御する対象のドア・タイマーのオブジェクトを、Inspector上から指定します。
以上の設定が完了すると、WebSocketから受信したデータを元にリアルタイムで仮想空間上のオブジェクトを動作させることが可能です。
おわりに
今回は、開閉センサーから取得したIoTデータにリアルタイム連動する簡単なデジタルツインを、AWS IoT Core×Unityを使って構築してみました。
デジタルツインは、行政が3D都市モデルを無償公開するなどして社会実装が推進されており、近い将来身近なものとなるかもしれません。
みなさん、注目してみてはいかがでしょうか。
私たちも、引き続きデジタルツインの社会実装に向け取り組んでいきたいと考えています。
参考文献